Table of contents
Using C/C++ code in statecharts Copy link to clipboard
itemis CREATE comes with a Deep C/C++ Integration feature, which allows for using C/C++ types, variables, and operations directly within the statechart model. C/C++ header files located in your workspace are automatically recognized by the tool, and all contained type and operation declarations are made accessible in the statechart editor with all its editing features like code completion and validation. In addition to your custom C/C++ types, the C99 standard primitive types, like int16_t, are also available out of the box.
Making your self-defined C/C++ types, structs, and unions available in your itemis CREATE statecharts saves you a lot of time and hassle that would otherwise be needed to map data from your C-type variables to statechart variables and vice versa.
The following screencast gives an overview of the Deep C/C++ Integration feature:
Another feature that comes with the Deep C/C++ Integration is the @ShortCIdentifiers annotation. It changes the naming scheme used by the code generator and activates more checks in the statechart validation to ensure that no identifiers produced by the code generator are longer than 31 characters.
Please be aware that the Deep C/C++ Integration requires a Professional Edition License.
What can you do with Deep C/C++ Integration? Copy link to clipboard
Deep C/C++ Integration allows you to use constructs declared in C/C++ header files seamlessly in your statecharts. For C, this includes:
- Functions, including variadic parameters
- Structs, unions and enums contained in a typedef
- Function pointers contained in a struct can be called right from your statechart
- Values introduced by the
#definestatement, e.g.,#define ARRAYSIZE 20 - Variables
- Arrays, provided they are allocated in the header file
- Pointers
The following C++ features are supported:
- Classes, including their fields and functions
- Namespaces
- Template classes and functions
- Functions with optional parameters
C/C++ features that are currently unsupported:
- Structs, unions and enums that are not contained in a typedef
- Accessing or modifying function pointer values in structs
- Constructors and initializers
- Memory allocation
- C++ references
How to use Deep C/C++ Integration Copy link to clipboard
Using Deep C/C++ Integration is pretty straightforward:
- You have to use a “C/C++ domain” statechart or change the domain of an existing statechart.
- The Eclipse project your statechart is in must be a CDT project.
The subsequent sections will explain how to use Deep C/C++ Integration in practice, using a sample project. In this example, we will define some geometry types like Point or Triangle in C/C++ header files and demonstrate how to make them available and use them in a statechart model. While this example covers C constructs only, there is no extra effort involved in using C++ features – with one exception: Your project must be a C/C++ or a pure C++ project.
Creating a new C project Copy link to clipboard
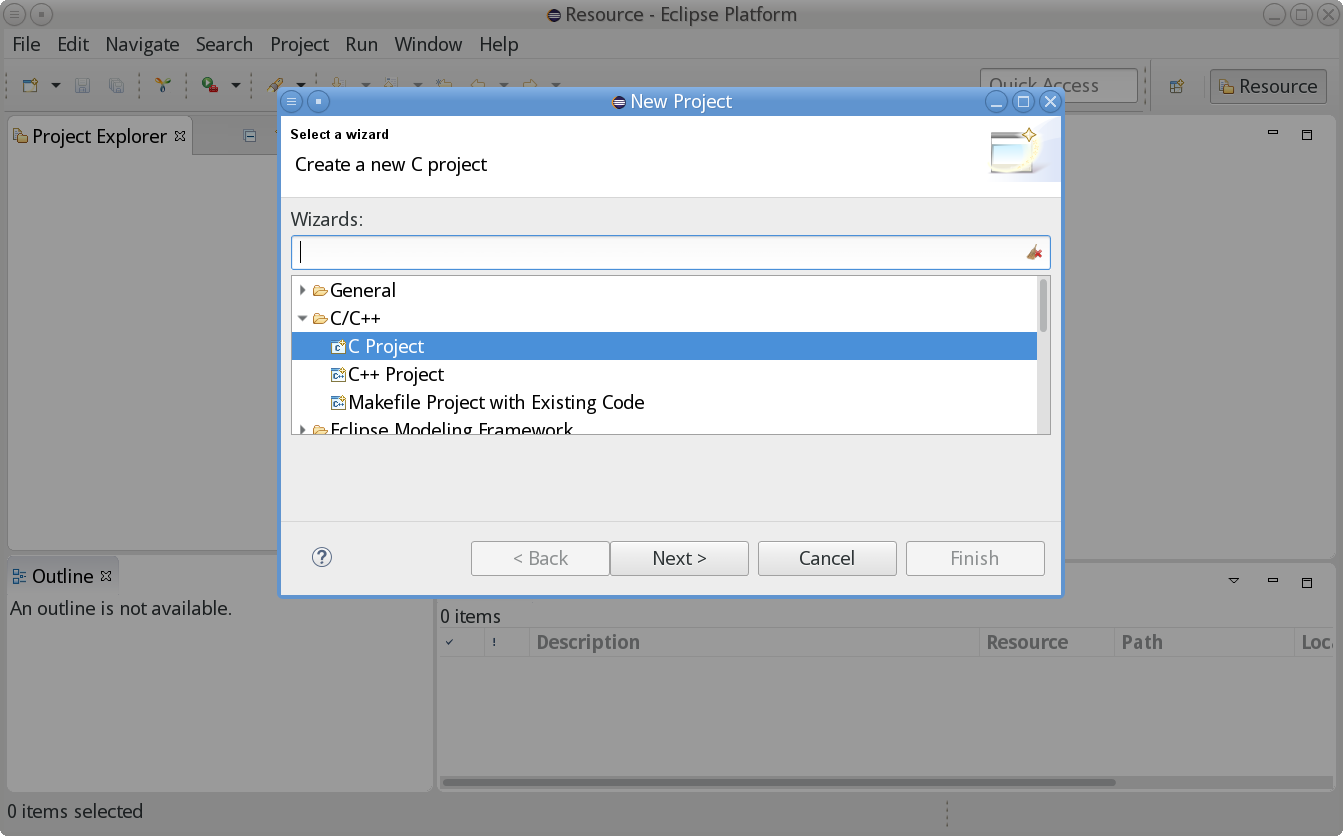
- In the Eclipse main menu, select File → New → Project…. The New Project wizard opens.
- Select
C/C++ → C Project.
- Click Next >. The C Project dialog appears.
- Enter the name of your project into the Project name field. For the sake of this example, we call the project Geometry.
- Specify the location of the project folder by either using the default location or by explicitly specifying a directory in the Location field.
- Select the Project type. In order to keep things plain and simple, for this example we create an Empty Project.
- Select the toolchain you want to work with. It contains the necessary tools for C development. By default only the toolchains supporting your local platform are displayed. Since this example has been created on a Linux machine, the toolchain
Linux GCC is shown.
- Click Next >.
- Specify platforms, configurations, and project settings. This is more specific to C than to itemis CREATE, so we won’t go into any details here.
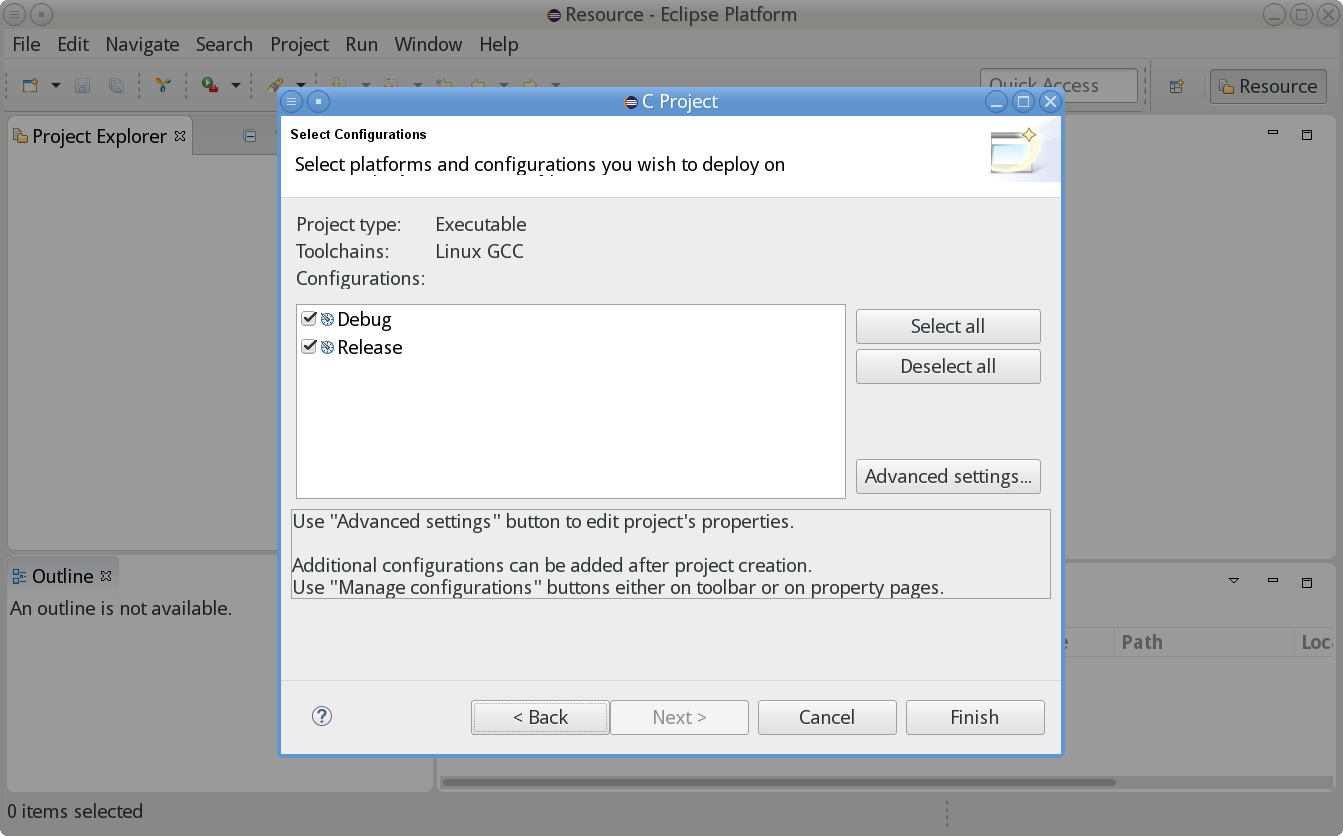
- Click Finish.
- Eclipse asks whether it should associate this kind of project with the C/C++ perspective. Usually this is what you want, so set a checkmark at Remember my decision and click Yes.
- Eclipse creates the C project, here Geometry.
Creating a C header file Copy link to clipboard
Now we can create a C header file specifying our own C type definitions which we can use in a state machine later. In order to create the file, let’s proceed as follows:
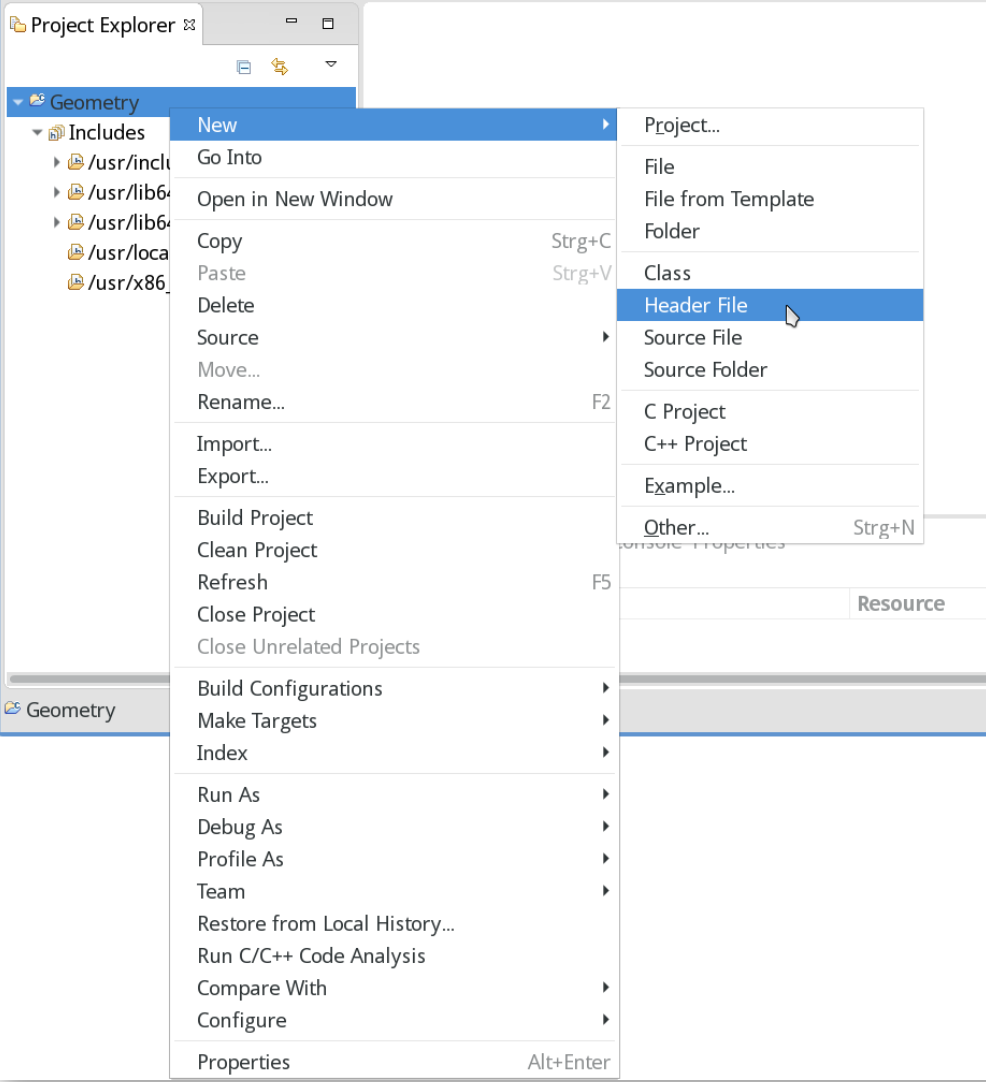
- In the project explorer view, right-click on the project. The context menu opens.
- In the context menu, select
New → Header File.
- The dialog
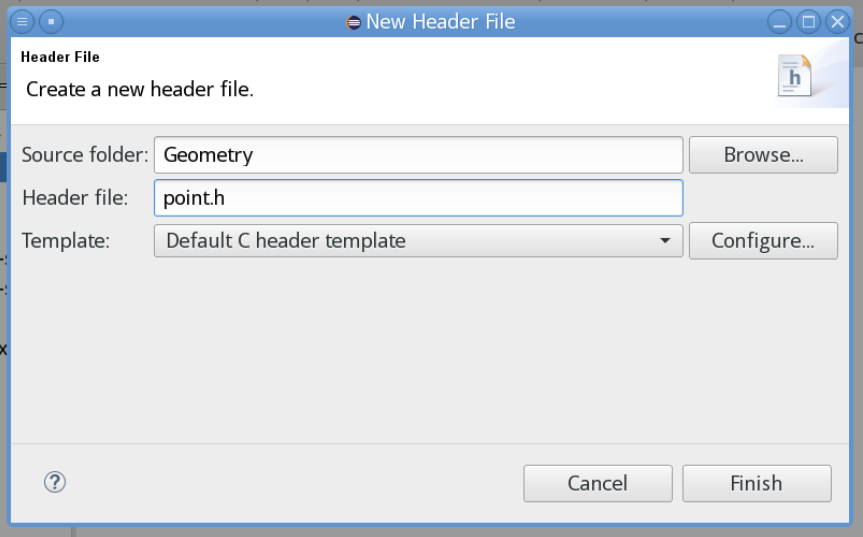
New Header File is shown. Specify the name of the header file. Here we choose
point.h.
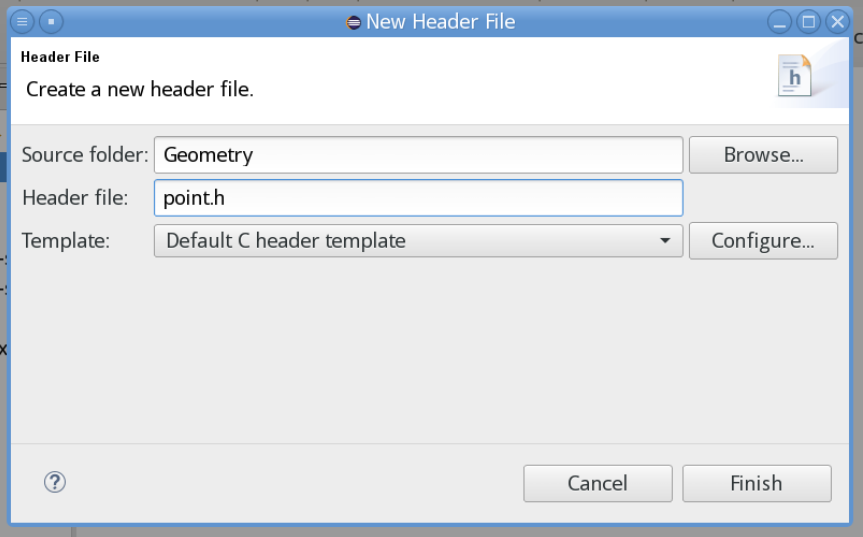
- Click Finish.
- The header file
point.h is created.
Defining a C struct Copy link to clipboard
In the created header file we define a struct type named Point, which we will later use in a statechart. A (two-dimensional) point consists of an x and a y coordinate. We choose int16_t to represent a coordinate, i.e., a 16-bit signed integer. The complete header file containing the struct definition looks like this:
/*
 * point.h
 *
 */

#ifndef POINT_H_
#define POINT_H_

#include <stdint.h>

typedef struct {
    int16_t x;
    int16_t y;
} Point;

#endif /* POINT_H_ */
Please note: In C it is possible to define structs, unions and enums without a typedef. They can be referenced by using the corresponding qualifying keyword ( struct, union, or enum, respectively). As the statechart language does not support these qualifiers, the usage of struct, union and enumeration types is currently restricted to those defined by a typedef.
Using C types in a statechart Copy link to clipboard
Creating a statechart model Copy link to clipboard
Let’s create a statechart model now to make use of the C type Point we have just defined.
- Right-click on the project. The context menu opens.
- Select New → C Statechart Model …. The New itemis CREATE wizard is shown.
- In the dialog, specify the directory and the filename for the new statechart model file. The filename should end with
.sct. - Click Finish. If Eclipse asks you whether to switch to the itemis CREATE Modeling perspective, please confirm.
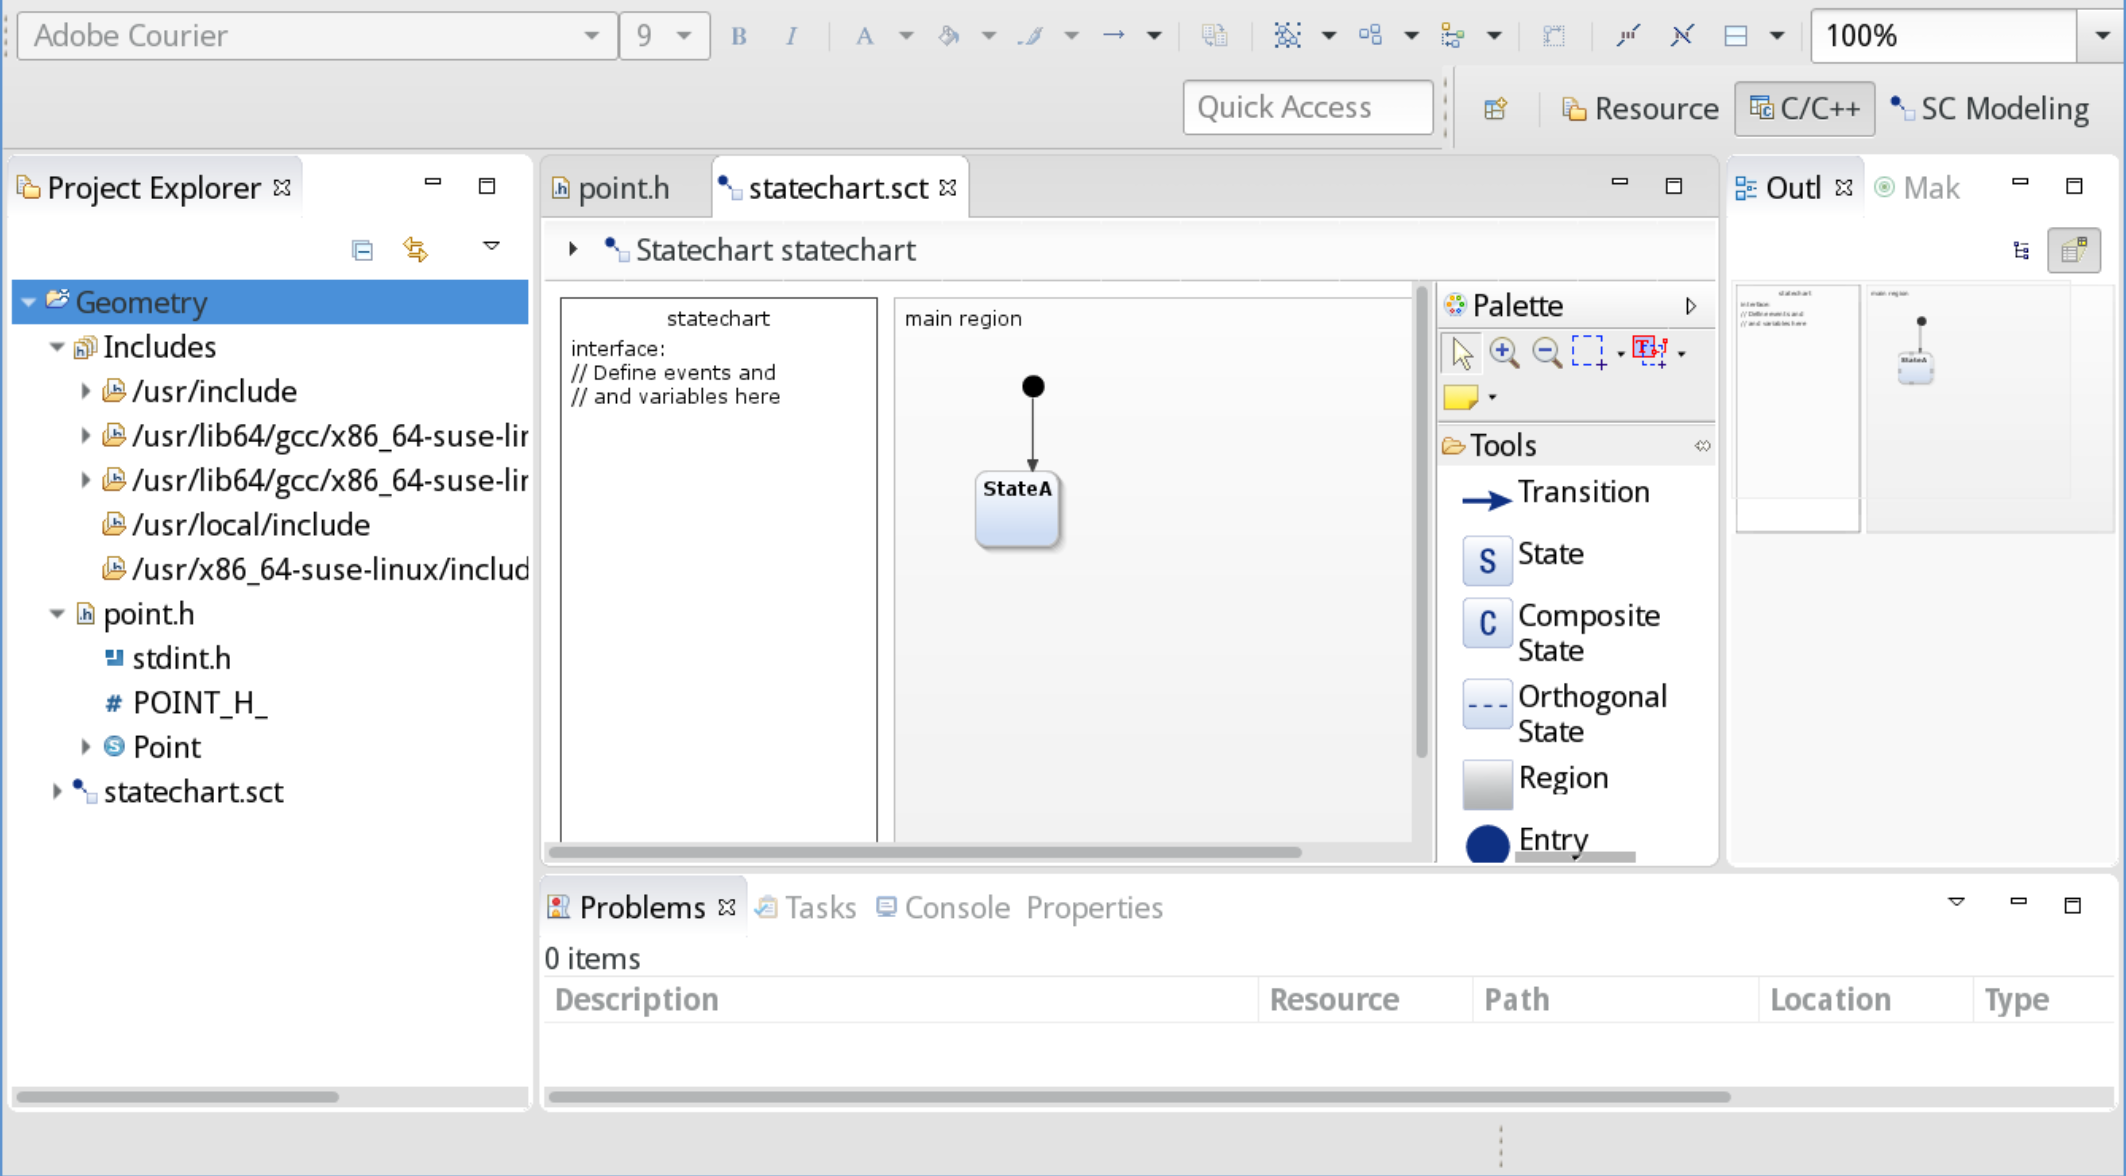
- The new statechart model is created:
Defining a C-type variable in a statechart Copy link to clipboard
Variables are defined in the definition section on the left-hand side of the statechart editor. Double-click into the definition section to edit it.
In order to make use of the struct defined above we have to import the point.h header file:
import: "point.h"
With the definitions from point.h at hand, we can declare a variable pointA of the Point type. In the statechart’s definition section, enter the following text:
interface:
    var pointA:
On the right-hand side of the colon in the variable declaration, the variable’s type must follow. In order to see which types are available, press
[Ctrl+Space]. The content assist opens and shows the C types available, depending on the headers imported within your statechart, i.e.
- the C basic standard types,
- the C99 types, provided by including stdint.h,
- the self-defined Point type, provided by including point.h,
- the qualifier pointer.
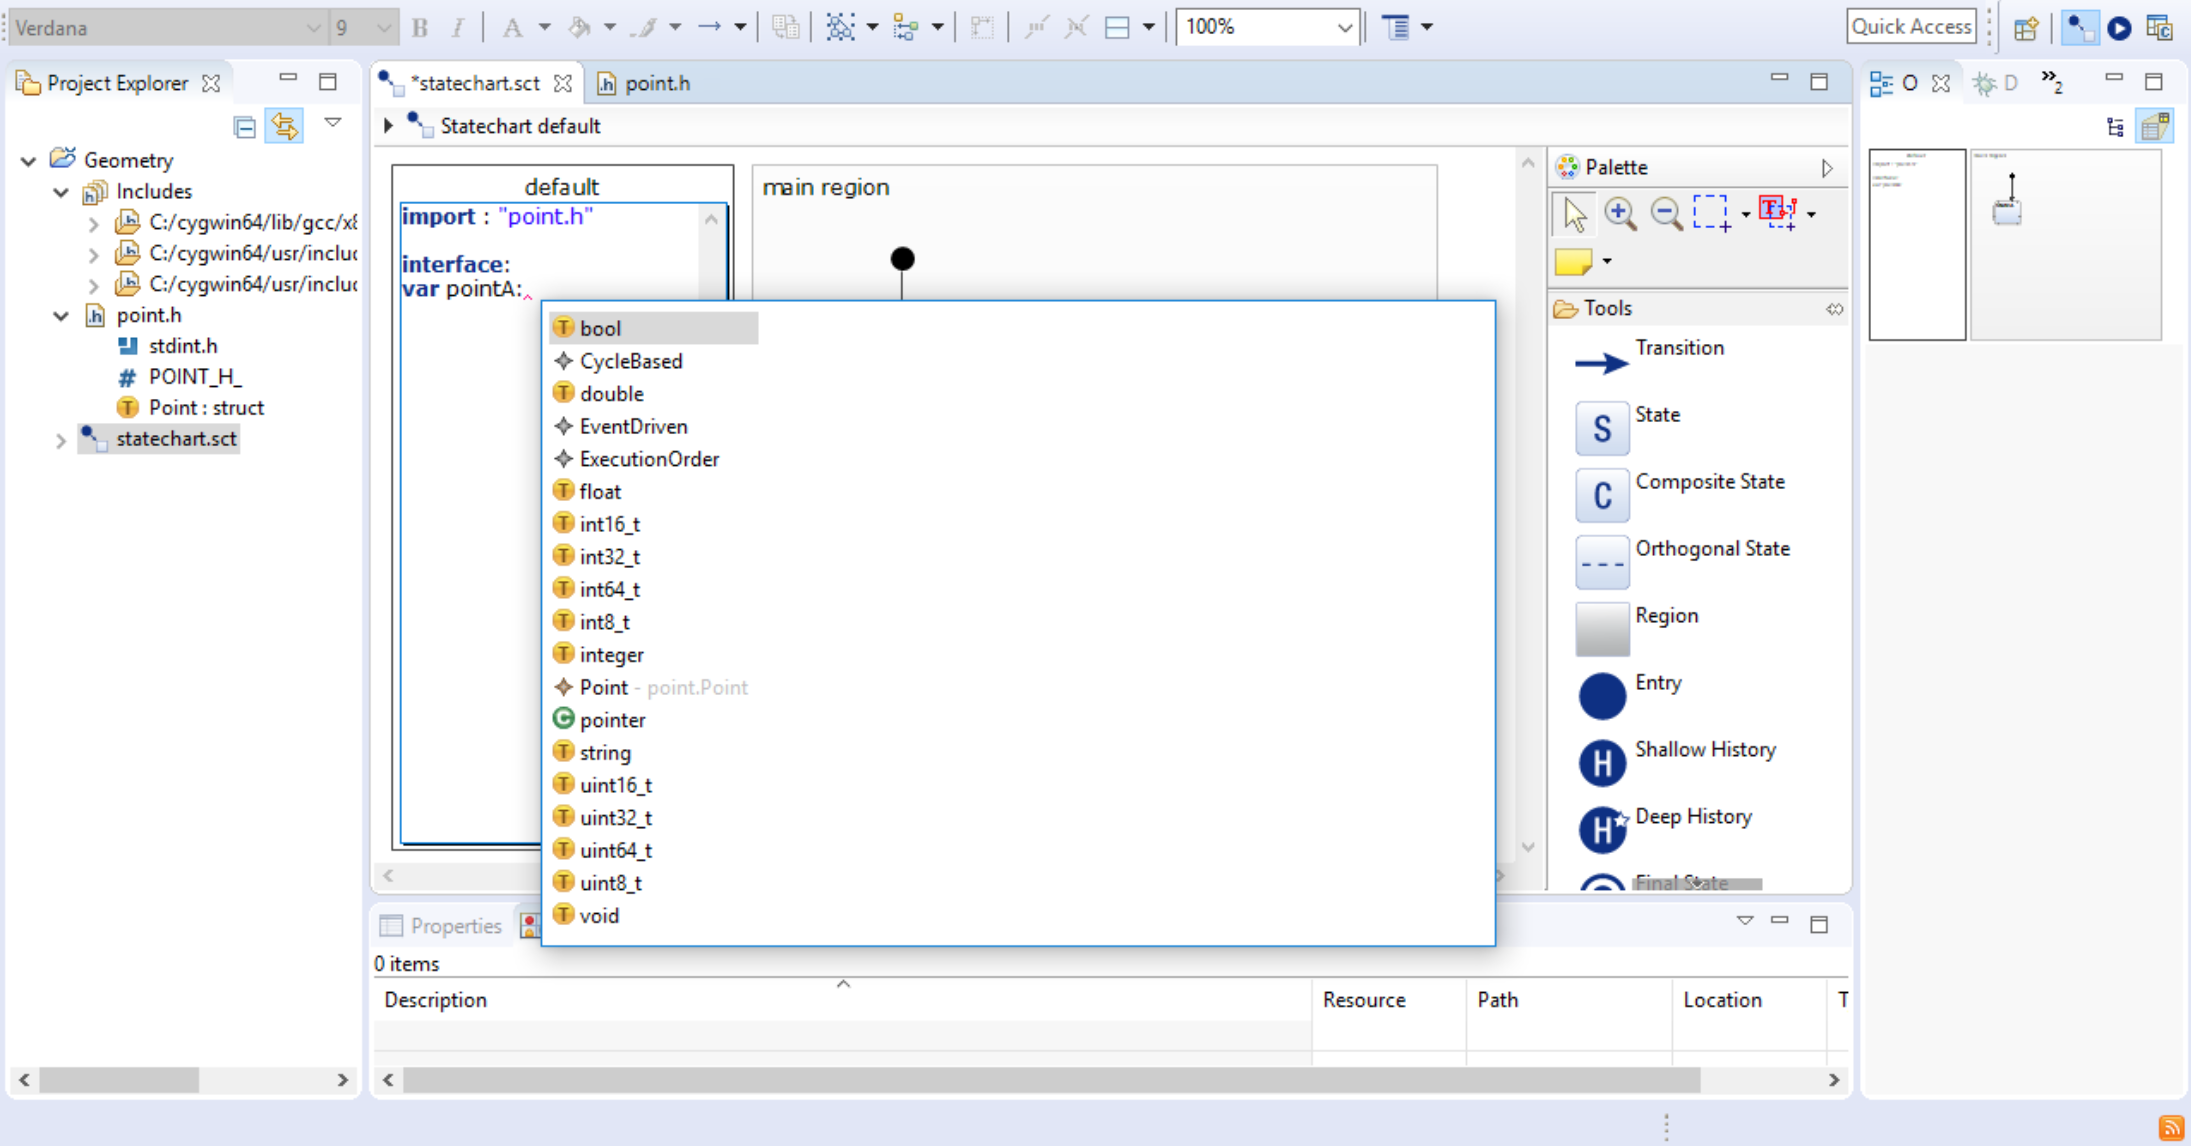
Using content assist to display available types
Selecting the Point menu entry completes the variable definition:
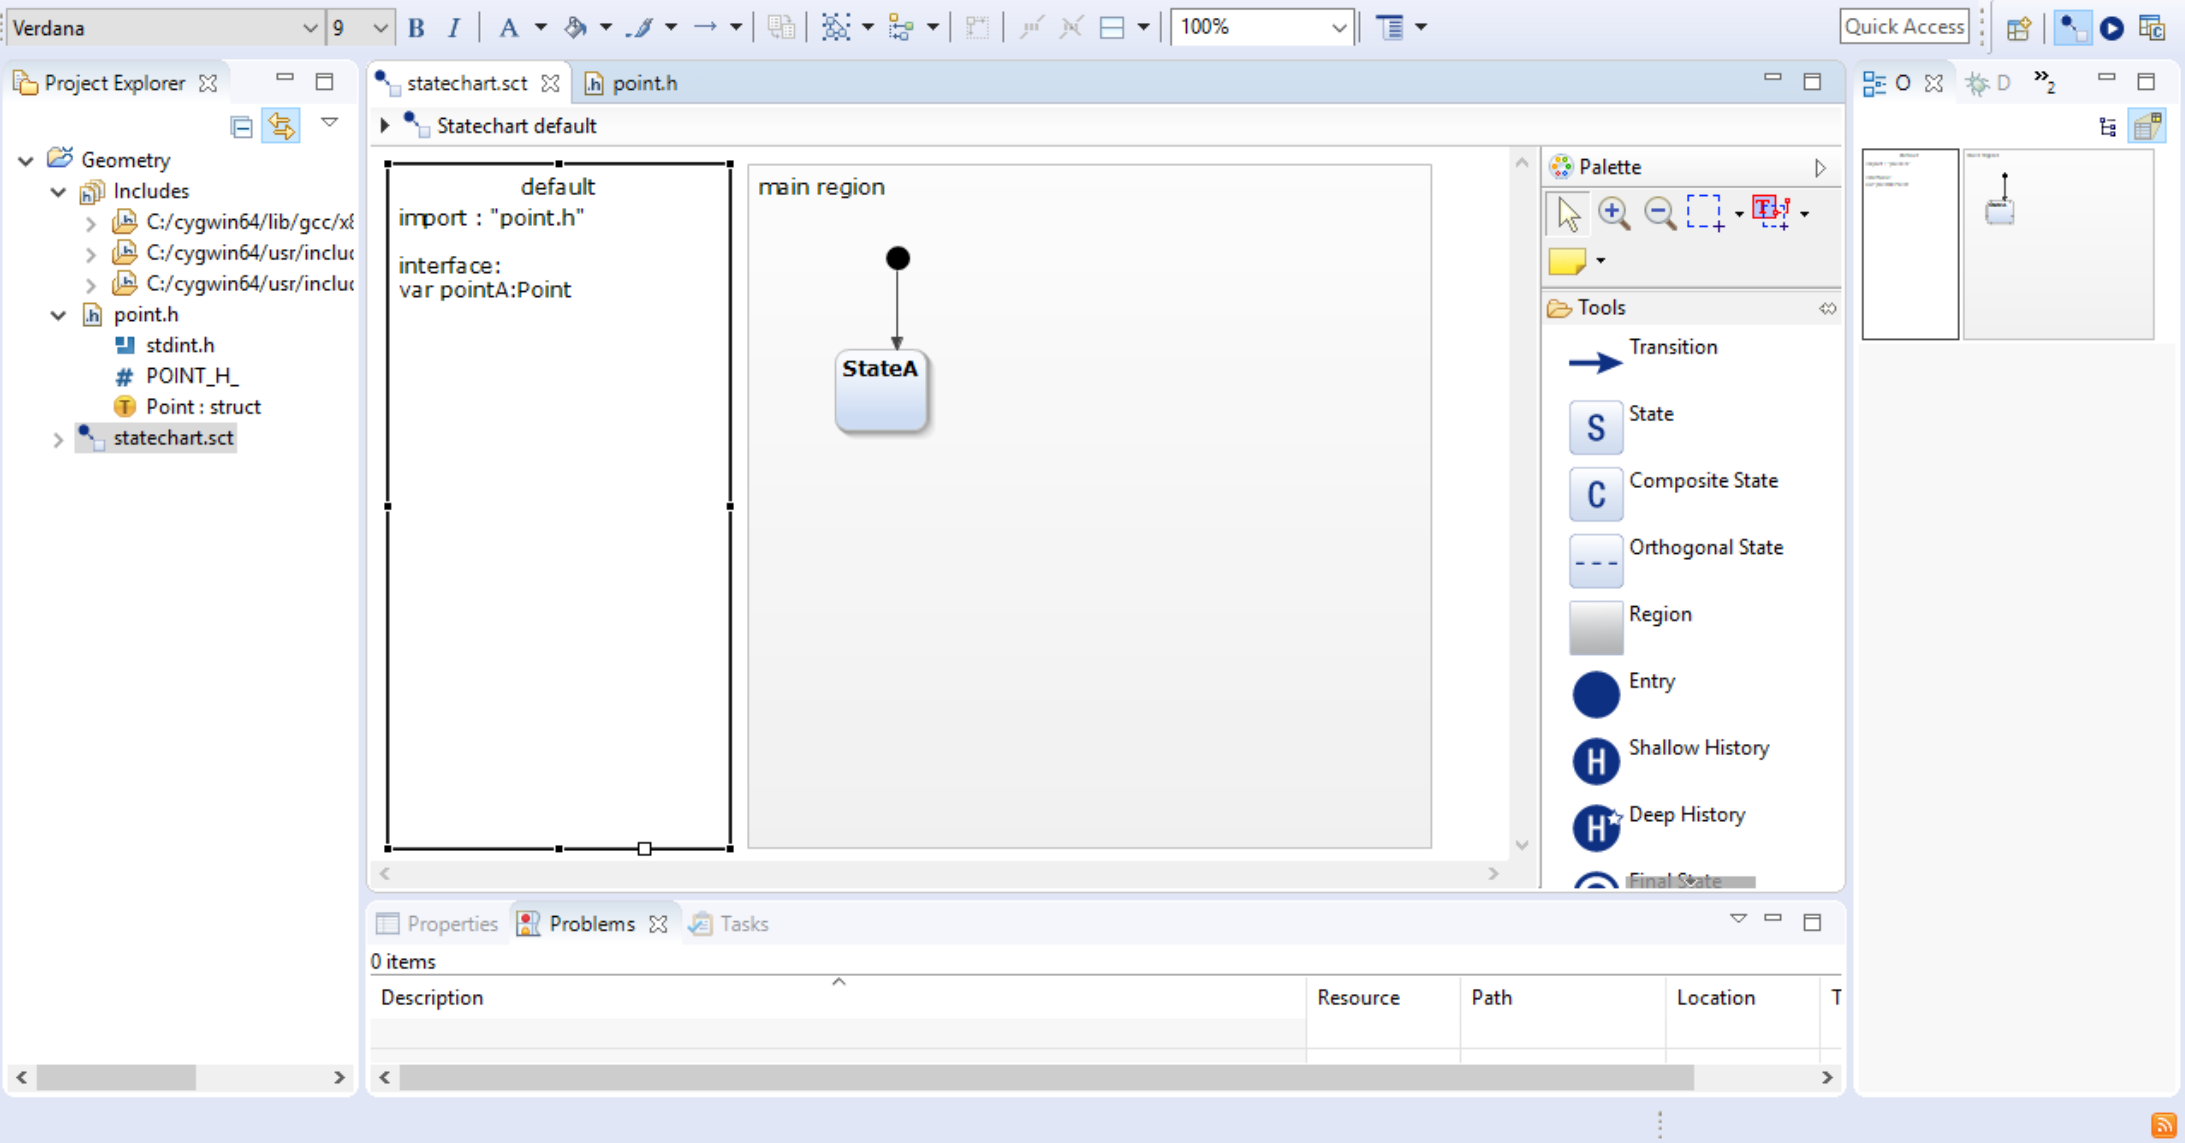
A Point variable
Using a C-type variable in a statechart Copy link to clipboard
A statechart variable with a C type can be used everywhere a “normal” statechart variable can be used.
It is now possible to declare variables with the type of the different statecharts, namely “CycleBasedStatemachine” and “EventDrivenStatemachine”. This is a representation of the statechart interface, which allows the
users to model multi-statemachine scenarios without binding the variables to a specific statechart. To access these types the internal “statemachine.types” have to be imported with the “import” keyword.
Let’s consider the above example extended by an additional count variable of the C99 int8_t standard type. Additionally, we introduce an event that will be used as a trigger to switch between states.
import: "point.h"
interface:
    var count: int8_t
    var pointA: Point
    in event tick
The statechart below uses these variables in various places, i.e., in transition actions, in internal actions, and in guard conditions.
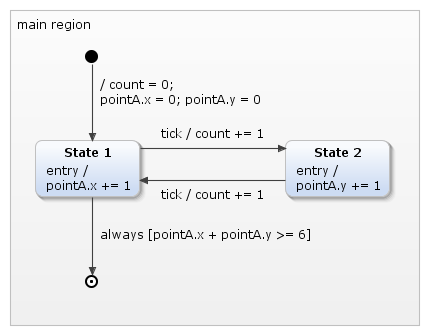
Using C-type variables
Variables of primitive types like
var count: int8_t are accessed as expected, e.g.,
count = 0 or
count += 1;
The dot notation is used to access structure elements. For example,
pointA.x = 0; pointA.y = 0 sets
pointA to the origin of the coordinate system.
The statechart type system Copy link to clipboard
When parsing a C header file, itemis CREATE are mapping the C data types to an internal type system. You can open a C header file in Eclipse with the Sample Reflective Ecore Model Editor to see how the mapping result looks like.
In case you are interested in the EMF model underlying itemis CREATE’s type system, you can find it in the source code of the itemis CREATE open edition at /org.yakindu.base.types/model/types.ecore.
Imports and includes Copy link to clipboard
Importing a C header Copy link to clipboard
itemis CREATE gives you direct access to C header files within the statechart model. This saves time during development, especially while integrating your state machine with your C program. In general you can import (include) all C header files residing in the same project as well as those header files that are available on one of the CDT project’s include paths, see Properties → C/C++ General → Paths and Symbols in the context menu of your C project. Valid file extensions for C/C++ header files: “.h”, “.hh”, “hpp”, “hxx” and “.inc”.
To import a C header file, go to the beginning of your statechart’s definition section, enter
import: and hit [Ctrl]+[Space]. The content assist now shows all C header files you can import (besides other syntactical elements that would be valid here). In our example one of the first includes provided by the content assist is
point.h, which is found in
/Geometry/point.h. Other imports shown by the content assist are provided by the various include paths configured in your CDT project. For example, figure
"Selecting a C header to import" shows headers on the basic
cygwin toolchain on a Windows system.
Please note: Contrary to a C compiler, itemis CREATE do not support transitive imports. That is to say, if a header file a.h imports another header file b.h using the
#includedirective, b.h will not be “seen” in itemis CREATE unless you import it explicitly in your statechart’s definition section.
The following picture for example .
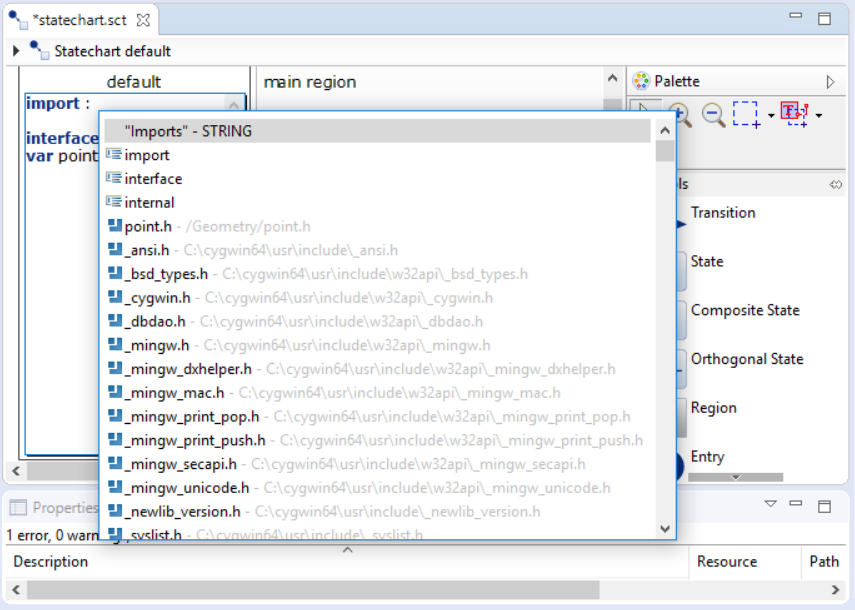
Selecting a C header to import
If we had more than a single header file in the project, we would see them all. The content assist shows all header files in a project, including those in subdirectories. A C header’s path is relative to the statechart it is imported into.
Click on the
point.h entry in the menu to complete the
import statement. The result looks like this:
import: "point.h"

interface:
    var pointA: Point
Data structure traversal via dot notation Copy link to clipboard
The dot notation to access structure members can traverse an arbitrary number of stages. As an example, let’s define a datatype named Triangle. A triangle is defined by three points. Using dot notation in a statechart, you can navigate from a triangle to its individual points and further on to the points' coordinates.
The C header file triangle.h specifies the Triangle type:
#ifndef TRIANGLE_H_
#define TRIANGLE_H_

#include "./point.h"

typedef struct {
    Point a, b, c;
} Triangle;

#endif /* TRIANGLE_H_ */
A Triangle consists of the three Points a, b, and c. Let’s define a Triangle t in a statechart’s definition section as follows:
import: "triangle.h"

interface:
    var t: Triangle
With this definition we can use expressions like
t.a.x, see the image below. Regardless of where you are currently editing an expression, you can always use the code assist to explore which fields are available at that very point and of which types these fields are. Example:
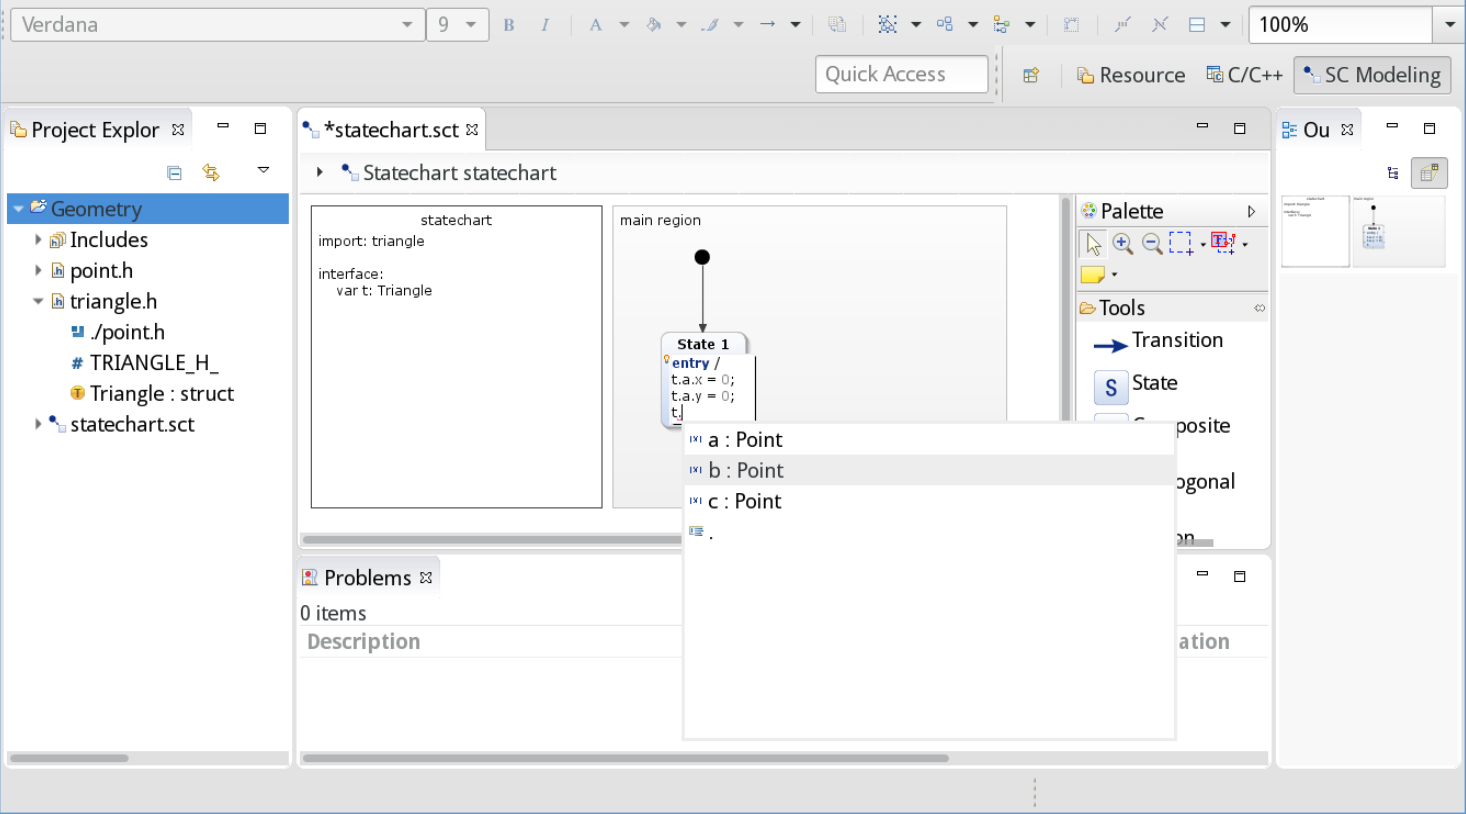
Content assist in data structure traversal
Pointers Copy link to clipboard
Pointers are a core feature of the C programming language. itemis CREATE’s Deep C/C++ Integration is making C pointers available to you in your statecharts. In particular, you can
- declare typed pointer variables,
- assign a pointer to a pointer variable of the same type,
- retrieve the pointer pointing to a given variable,
- pass pointers as parameters to functions, and
- receive a pointer as a functions return value.
Declaring pointer variables Copy link to clipboard
From version 5.1 Create supports the usage of smart pointers. They can be used externally e.g. in a header file or can be declared internally e.g. as the type of a statechart variable. As smart pointers got introduced in C++11 they are only supported with our C++11 code generator. Other C domain code generators will replace smart pointers with raw pointers. With this addition, some generator options got introduced too to enable the customization of which parts of the generated code the user wants to use smart pointers. For more detail on that please see GeneratorOptions feature .
Please be aware of that unique pointers may result in not functioning code out of the box as they require special handling regarding ownership.
Pointer variables are declared in a statechart’s definition section as shown in the following example:
var n: int32_t
var pInt: pointer<int32_t>
var spInt: shared_ptr<int32_t>
var ppInt: pointer<pointer<int32_t> >
var pTriangle: pointer<Triangle>;
The declarations above declare
- n as a (non-pointer) variable of type int32_t,
- pInt as a pointer variable that is pointing to a variable of type int32_t,
- spInt as a smart pointer variable that is pointing to a variable of type int32_t,
- ppInt as a pointer that is pointing to a pointer that is pointing to a variable of type int32_t, and
- pTriangle as a pointer to a variable of the self-defined type Triangle.
Please note: When closing the type specification in a pointer declaration with angle brackets, e.g.,
pointer<pointer<int32_t> >, the>characters must be separated from each other by one or more white space characters. Writing, for example,pointer<pointer<int32_t>>would result in an error. This restriction will be fixed in a later release.
Using pointer variables Copy link to clipboard
In order to actually assign a pointer to a pointer variable, you have to get hold of that pointer. To retrieve the pointer to a variable v, use v's extension function pointer. That is, for a variable v, the expression v.pointer evaluates to a pointer to v. Each variable has the pointer extension function.
From version 5.1 all variables also have the unique_ptr, shared_ptr, weak_ptr extension functions that will function just like the already existing pointer extension, only retrieving the corresponding smart pointer instead of raw pointer type.
Please be aware that unique pointers may result in not functioning code out of the box as they require special handling regarding ownership.
Example: Let’s say the pointer variable pInt (declared in the example above) should point to the variable n. The following assignment accomplishes this:
pInt = n.pointer
Similarly, a pointer to a pointer to a base type can be retrieved as follows:
ppInt = pInt.pointer;
Or even:
ppInt = n.pointer.pointer
In order to deference a pointer, i. e. to retrieve the value of what the pointer is pointing to, use the value extension function, which is available on all pointer-type variables.
Example: Let’s say the pointer variable pInt (declared in the example above) is pointing to some int32_t variable. The value of the variable pInt is pointing to should be assigned to the int32_t variable n. The following assignment accomplishes this:
n = pInt.value;
Similarly, if ppInt points to a pointer pointing to some int32_t variable, the following statement retrieves the latter’s value:
n = ppInt.value.value;
Passing pointer parameters to C functions is straightforward. Let’s say you have a C function to rotate a triangle around a center point by a given angle. The C function is defined like this:
Triangle* rotateTriangle(Triangle* triangle, Point* centerPoint, float angle) { … }
Provided the function is declared in an imported C header file, you can call it directly like this:
pTriangle2 = rotateTriangle(pTriangle, pCenterPoint, 45.0);
Please note: Assigning a pointer to a pointer variable is only possible if the pointer types are the same.
Arrays Copy link to clipboard
Unlike other variables, arrays are not defined in a statechart’s definition section, but rather on the C side in header files. Importing a C header containing an array definition makes the array available to a statechart.
While itemis CREATE’s Deep C/C++ Integration provides mechanisms for accessing individual elements of an existent array, arrays must be allocated statically or dynamically in C. Initializing the array elements is possible in C as well as in the statechart. However, depending on the concrete application it might generally be easier in C.
From version 5.1 it is also possible to use the array access on pointers that are declared in the statechart itself.
The header file sample_arrays.h defines a couple of sample arrays:
#ifndef SAMPLE_ARRAYS_H_
#define SAMPLE_ARRAYS_H_

#include <stdint.h>
#include "triangle.h"

int32_t coordinates[] = {0, 0, 10, 0, 5, 5};

Triangle manyTriangles[200];

int32_t * pArray[10];

#endif /* SAMPLE_ARRAYS_H_ */
The following arrays are defined:
- coordinates is statically allocated to hold six int32_t elements and it is initialized with values for all six of them. More precisely, the number of elements in the initializer determines the size of the array.
- manyTriangles is statically allocated with enough memory to hold 200 elements of the self-defined Triangle type. However, these elements are not initialized. This can and should be done either in C or in the state machine. An example is given below.
- pArray is of size 10 and holds pointers to int32_t values.
As mentioned above, importing a header file containing array definitions into the statechart’s definition section is sufficient to make the arrays available in a statechart. Example:
import: sample_arrays
With this import, you can access the arrays in statechart language expressions, for example in a state’s local reactions:
entry /
coordinates[2] = 42
Writing to array elements is as straightforward as you would expect. Examples:
coordinates[0] = coordinates[0] + 1;
pArray[3] = n.pointer;
pArray[4] = coordinates[0].pointer
Passing arrays as parameters to C functions is straightforward. Let’s say you have a C function sort to sort the elements of a one-dimensional int32_t array and return a pointer to the sorted array:
int32_t* sort(int32_t data[], int size) {…}
Please note that in C a function cannot return an array as such, but only a pointer to it. Analogously you cannot pass an array by value as a parameter to a function, i. e. the data bytes the array is consisting of are not copied into the function’s formal parameter. Instead a pointer to the array is passed to the function, or – to be more exact – a pointer to the array’s first element. To express this in the function’s formal parameter type, you can specify the
sort function equivalently to the above definition as follows. The
data parameter is now specified as
int32_t* data instead of
int32_t data[], but the meaning is exactly the same.
int32_t* sort(int32_t* data, int size) {…}
Provided the function is declared in an imported C header file, you can call it directly like this:
sort(coordinates, 6)
Please note: The current itemis CREATE release only supports statically allocated arrays. Arrays dynamically allocated using malloc() or calloc() will be supported in a later version.
Enums Copy link to clipboard
Besides specifying structured types, it is also possible to declare enumeration types in a C header. Here’s the header file color.h, which defines the Color enumeration type:
#ifndef COLOR_H_
#define COLOR_H_

typedef enum {
    RED, GREEN, BLUE, YELLOW, BLACK, WHITE
} Color;

#endif /* COLOR_H_ */
Now let’s extend the Triangle defined above by a fill color:
#ifndef TRIANGLE_H_
#define TRIANGLE_H_

#include "./point.h"
#include "./color.h"

typedef struct {
    Point a, b, c;
    Color fillColor;

} Triangle;

#endif /* TRIANGLE_H_ */
Similar to the Triangle type or any other C type, the Color enumeration type can be used in the statechart, e.g., by declaring an additional interface variable:
import: "color.h"
import: "triangle.h"

interface:
    var t: Triangle
    var c: Color = Color.BLUE
Please note that unlike structured types, enumeration variables can be initialized directly in their definitions within the statechart’s definition section.
In order to see which enumeration values are available, the content assist, triggered by
[Ctrl+Space], is helpful again.
![Using content assist to select an enumeration value [1] Using content assist to select an enumeration value [1]](https://www.itemis.com/hubfs/solutions/itemis-create/documentation/images/cdom_geometry_083_enum_010_content_assist.png)
Using content assist to select an enumeration value [1]
Once initialized, the c variable can now be used, e.g., in an assignment to the triangle t's fill color:
t.fillColor = c;
Accordingly, during simulation, the values of enum variables are displayed in the simulation view. It is also possible to modify them manually.
![Using content assist to select an enumeration value [2] Using content assist to select an enumeration value [2]](https://www.itemis.com/hubfs/solutions/itemis-create/documentation/images/cdom_geometry_083_enum_020_simulation.png)
Using content assist to select an enumeration value [2]
Operations Copy link to clipboard
A function declared in a C header file becomes available in a statechart. The state machine can call it as an operation.
Let’s say our rectangle.h header file not only defines the data type, but also declares one or more C functions to operate on them. The following line declares a function named area, taking a Rectangle parameter by value and returning an int32_t result.
extern int32_t area(Rectangle r);
For the sake of the example, let’s assume the function calculates the area of the given rectangle. Of course we could also do this with means built into the statechart language. However, in the general case you neither can nor want to do that.
- Implementing the functionality in the statechart language might not be possible, because the latter does not provide the necessary means, e.g., to pull some data from an external source.
- Even if it would be possible to implement the functionality in the statechart language, it might still not be desirable, if the functionality has been developed and fully tested in C already. You will neither want to re-invent the wheel nor would you want to introduce any new errors into an alternative implementation.
itemis CREATE parses function declarations in header files and makes the functions available in the statechart language. It doesn’t care where those functions are defined – or whether they are defined at all – nor what they do. Questions like these will become relevant later when the state machine is generated as C source code, compiled and linked to the functions' implementations.
For now, once the statechart knows about the
area function’s declaration in the C header file, the function can be used immediately in statechart language operations. A corresponding
operation declaration in the statechart’s definition section is not needed. Example:
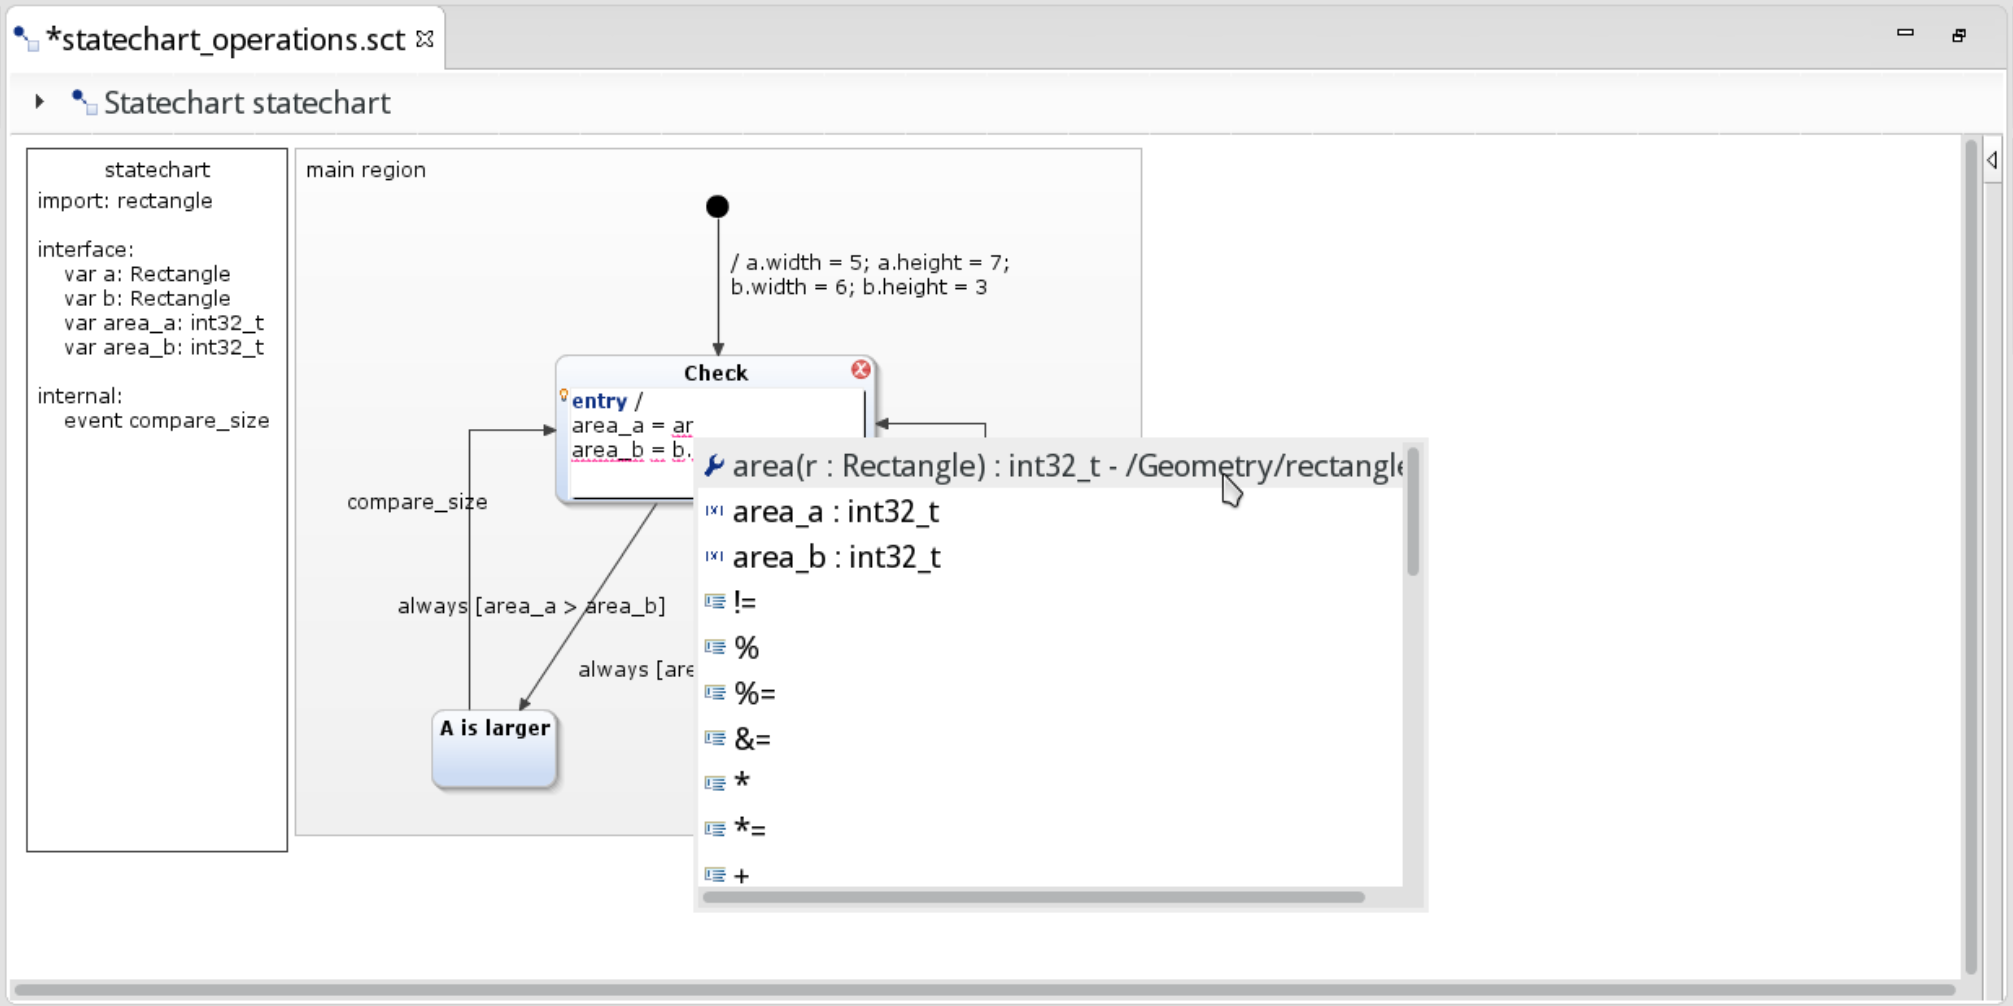
Using content assist to enter a C function call
Here’s the complete example with the area calculations done by the area function:
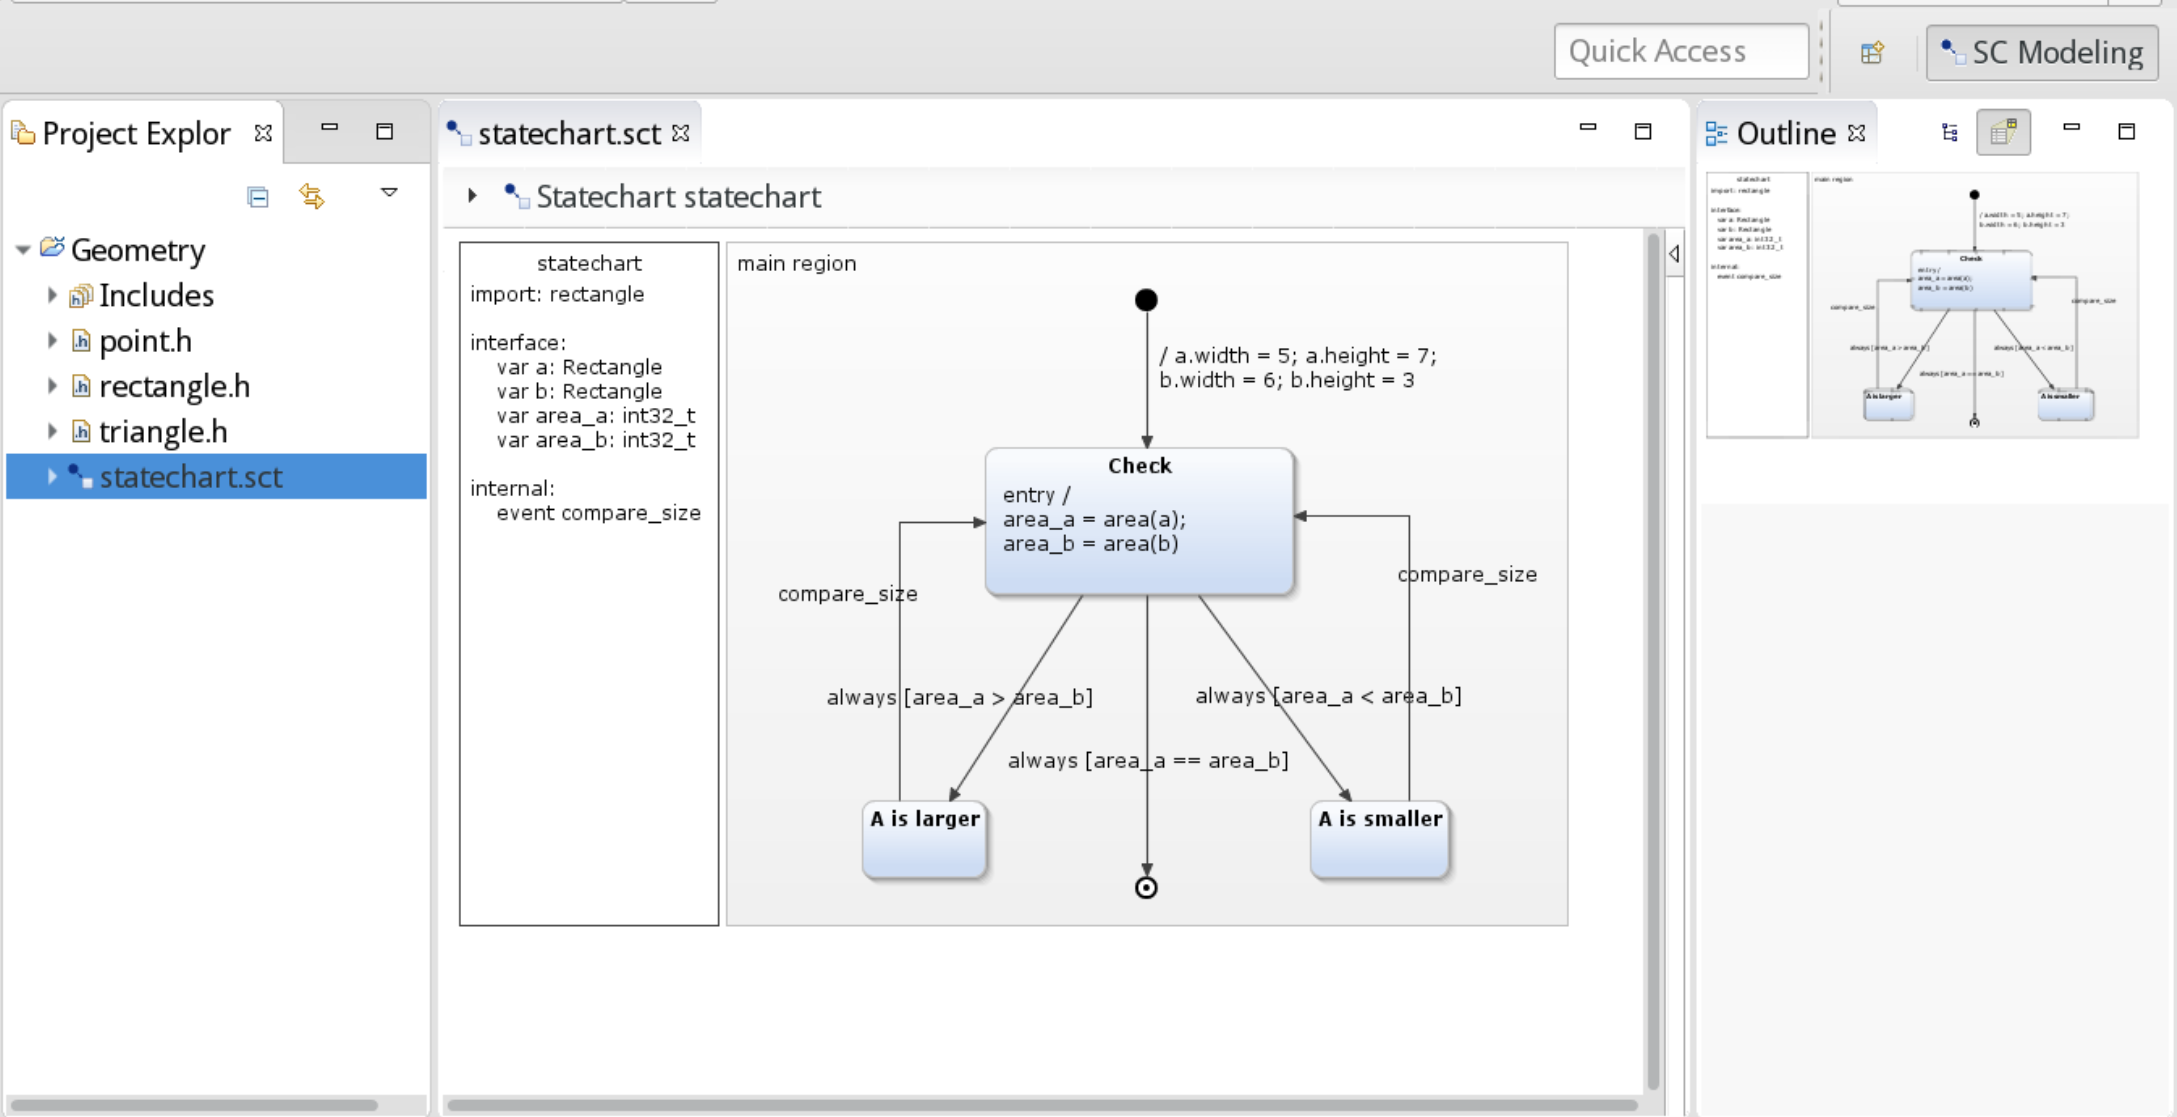
Example calling the “area” function
Please note: State machines calling C functions as operations are debarred from simulation and debugging. The simulator is not yet capable to call C functions.
C++ classes Copy link to clipboard
Classes and structs declared in C++ header files are usable from statecharts as well.
class Point
{
    public:
        int32_t get_x();
        void set_x(int32_t x);
        int32_t get_y();
        void set_y(int32_t y);
    private:
        int32_t x;
        int32_t y;
};
By importing a header file containing this C++ class definition, one or more variables of the Point type can be defined in the statechart:
import: "Point.h"
interface:
    var PointA: Point
    var PointB: Point
    out event e
As expected, it is possible to access public functions and fields of these variables. For example, x and y can be set and read from within a state’s or a transition’s reactions:
entry / PointA.set_x(42); PointA.set_y(0)
[PointA.get_x() == 42] / raise e
There are some constraints which you must consider:
- If you declare variable values or event payloads to be instances of a class or struct then the class must define a public default constructor (one without parameters).
- If a variable value in a public interface is defined to be a class instance then the class must define a public copy constructor and a public assign operator. These exist if they are not explicitly deleted or declared private. This constraint does not apply to internal variables.
- If an event payload is defined to be a class instance then the class must define a public copy constructor and a public assign operator. This constraint applies independent of the interface type.
Reference types can be used without these constraints.
C++ template classes and functions Copy link to clipboard
Template classes Copy link to clipboard
C++ allows to create generic constructs by defining templates. For example, if you want to be able to create Point objects with integer as well as floating point coordinates, you could write:
template<typename T>
class Point
{
    public:
        T get_x();
        void set_x(T x);
        T get_y();
        void set_y(T y);
    private:
        T x;
        T y;
};
This definition creates a generic type in itemis CREATE. In the definition section, you then supply the concrete type parameter, here int32_t:
import: "Point.h"
interface:
    var PointA: Point<int32_t>
    var PointB: Point<int32_t>
    out event e
Instead of int32_t, double, ComplexNumber, or any other type could have been specified instead.
itemis CREATE verifies the usage. Thus with
int32_t, the function call
PointA.set_x(4.2) would be flagged as an error.
Template functions Copy link to clipboard
C++ also allows to create template functions, which can, but don’t have to, be a part of a class.
A typical example is a
max(T a, T b) function:
template<typename T>
T max(T a, T b)
{
    return (a < b) ? b : a;
}
Template functions do not have to have their type parameter declared. itemis CREATE checks whether the supplied arguments are compatible. Calling
max(4, 3.5) would be fine, and
T would be inferred to be
double, whereas
max(4, true) is invalid, because integer types and boolean types are not compatible.
Namespaces Copy link to clipboard
In C++, things can be organized in namespaces. Namespaces are typically applied to classes.
namespace Geo {

    class Point
    {
    public:
        double get_x();
        void set_x(double x);
        double get_y();
        void set_y(double y);
    private:
        double x;
        double y;
    };

}
To use the
Point class, one would have to write
Geo::Point in C++. In itemis CREATE, namespaces are reflected as
packages. For each header file you import into your statechart, a package is created, plus an additional package for each namespace.
In the definition section, one would write:
import: "Point.h"
interface:
    var PointA: Geo.Point
    var PointB: Geo.Point
    out event e
Namespaces can be nested, so if namespace
Geo would be contained in namespace
Math,
Point would be addressed as
Math.Geo.Point.
Simulation Copy link to clipboard
During a statechart simulation full access to the C data structures is possible on all layers. The user can inspect them as well as modify them in the simulation view.
The state machine below exemplifies this. Initially it defines two rectangles a and b with certain widths and heights. The state machine calculates the rectangles' respective area size, stores their sizes in two int32_t variables named area_a and area_b, and compares them. Depending on the result, it proceeds to state A is larger or to A is smaller. Only if both a and b have the same area – not necessarily the same width and height –, the state machine proceeds to its final state.
When one of the states A is larger or A is smaller is active, the rectangles' properties can be changed. Triggering the compare_size event transitions to the Check state which repeats the area size comparison as described above.
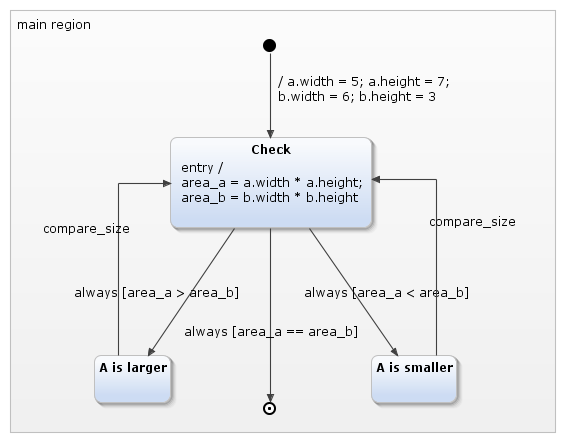
The rectangle comparison statechart
The state machine’s definitions are as follows:
import: "rectangle.h"

interface:
    var a: Rectangle
    var b: Rectangle
    var area_a: int16_t
    var area_b: int16_t

internal:
    event compare_size
The Rectangle datatype is defined in a new header file rectangle.h with the following contents:
#include "./point.h"

typedef struct {
    Point lowerLeft;
    int16_t width, height;
} Rectangle;
In order to simulate the statechart, right-click on the statechart file in the project explorer and select Run As → Statechart Simulation from the context menu.
The statechart simulation
- starts,
- performs the initializing actions specified in the transition from the initial state to the Check state,
- in the Check state, calculates the rectangles' areas and stores the results in the area_a and area_b variables,
- transitions to the A is larger state, because its guard condition is fulfilled, and
- stops, waiting for the compare_size event to occur.
Inspecting C data structures Copy link to clipboard
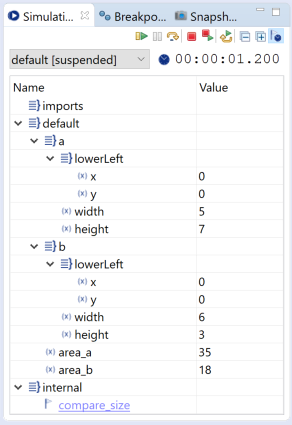
Inspecting C data structures
The simulation view in the screenshot above is showing the state machine’s variables and their values. Click to open or close the nested data structures. The image below shows in particular
- the rectangles' respective width and height values as have been set initially,
- the calculated areas of the a and b rectangles,
- the coordinates of the points defining the respective lower left corner of the rectangles.
Warning: Simple C variables and fields in C data structure are not initialized. Never try to read a variable or field you haven’t written before, because it might contain arbitrary values.
Even if the Point data structures in the example above look like having been initialized to defined values, they are not. Without going into details, in C, variables are generally not initialized. This also holds for statechart variables from the C integration. If you are reading a variable, make sure you have written to it before. Otherwise you might get surprising and non-deterministic results.
Modifying C data structures Copy link to clipboard
Change a variable’s or field’s value as follows:
- Click on the value displayed in the simulation view.
- Enter the new value into the text field, see figure "Modifying C data values" where a.height is being edited and the previous value 7 is replaced by 3.
- Press the
[Enter]key to quit editing and to write the new value to the variable or field. Giving the input focus to another window has the same effect. - You can cancel editing by pressing the
[Esc]key. The variable’s or field’s value remains unchanged.
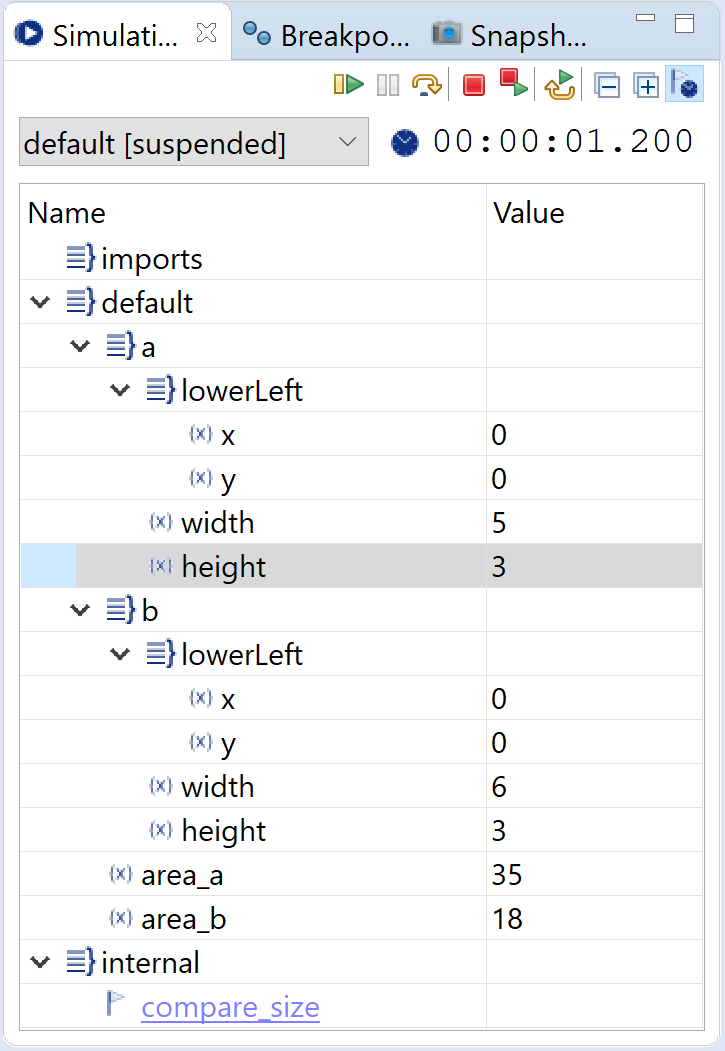
Modifying C data values
In the example, click compare_size to trigger the event. The state machine transitions to the Check state, recalculates the areas, and behaves as explained above.
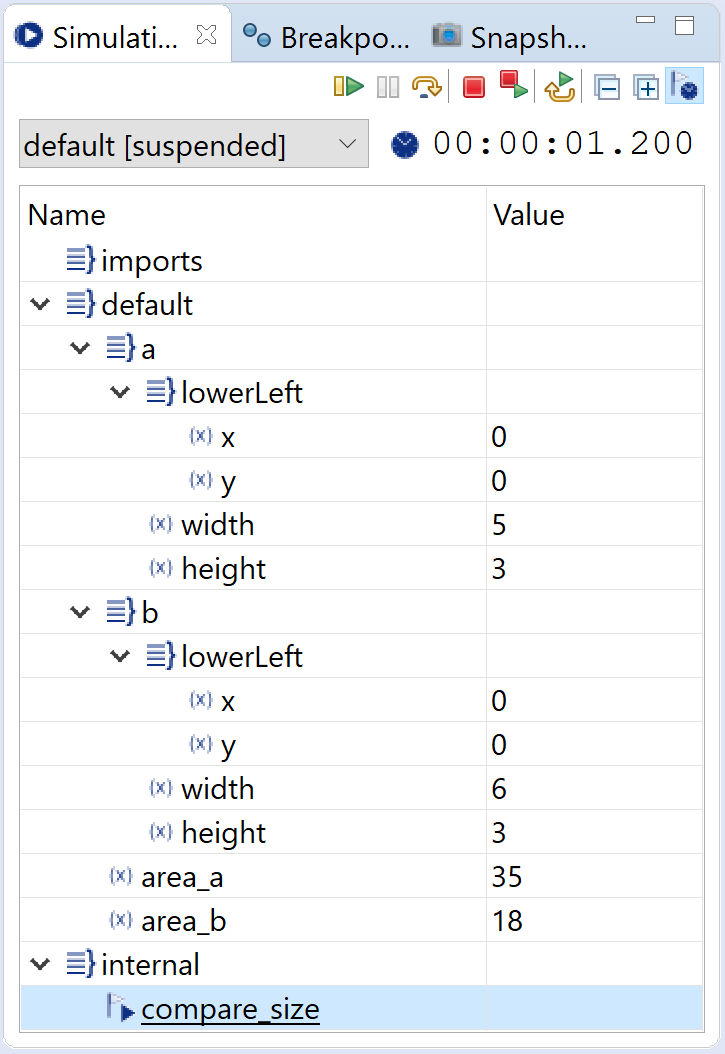
Rectangle areas modified and rechecked
Looking up a type definition Copy link to clipboard
Given a variable definition in a statechart’s definition section, you can lookup the corresponding type definition. The definition section must be in editing mode, i.e., you must have double-clicked into it. Now press the
[Ctrl] key and move the mouse pointer over the type name. The former changes its shape into a hand symbol and the latter changes into a hyperlink:
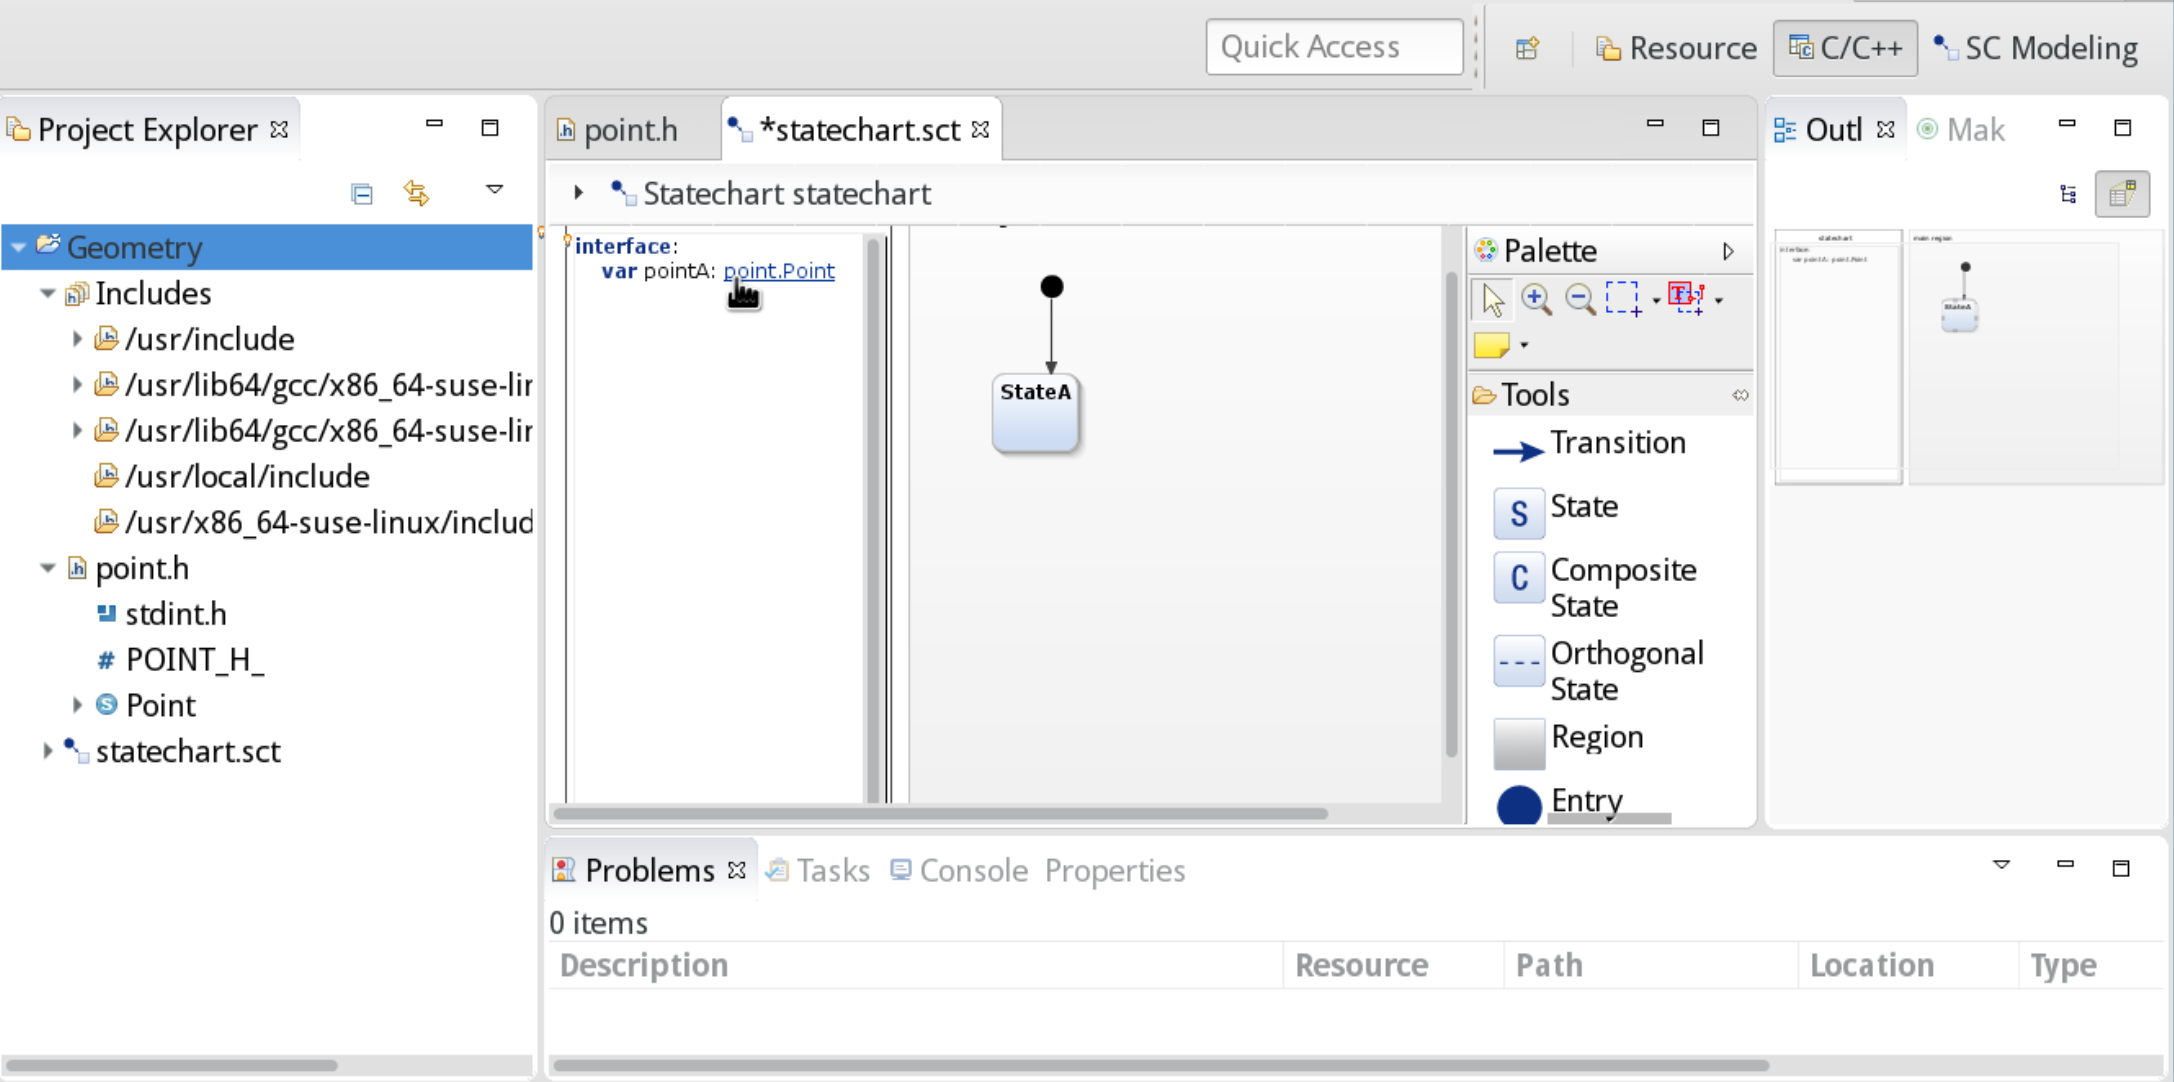
Looking up a C type
Click on the hyperlink to open the header file containing the respective type declaration.
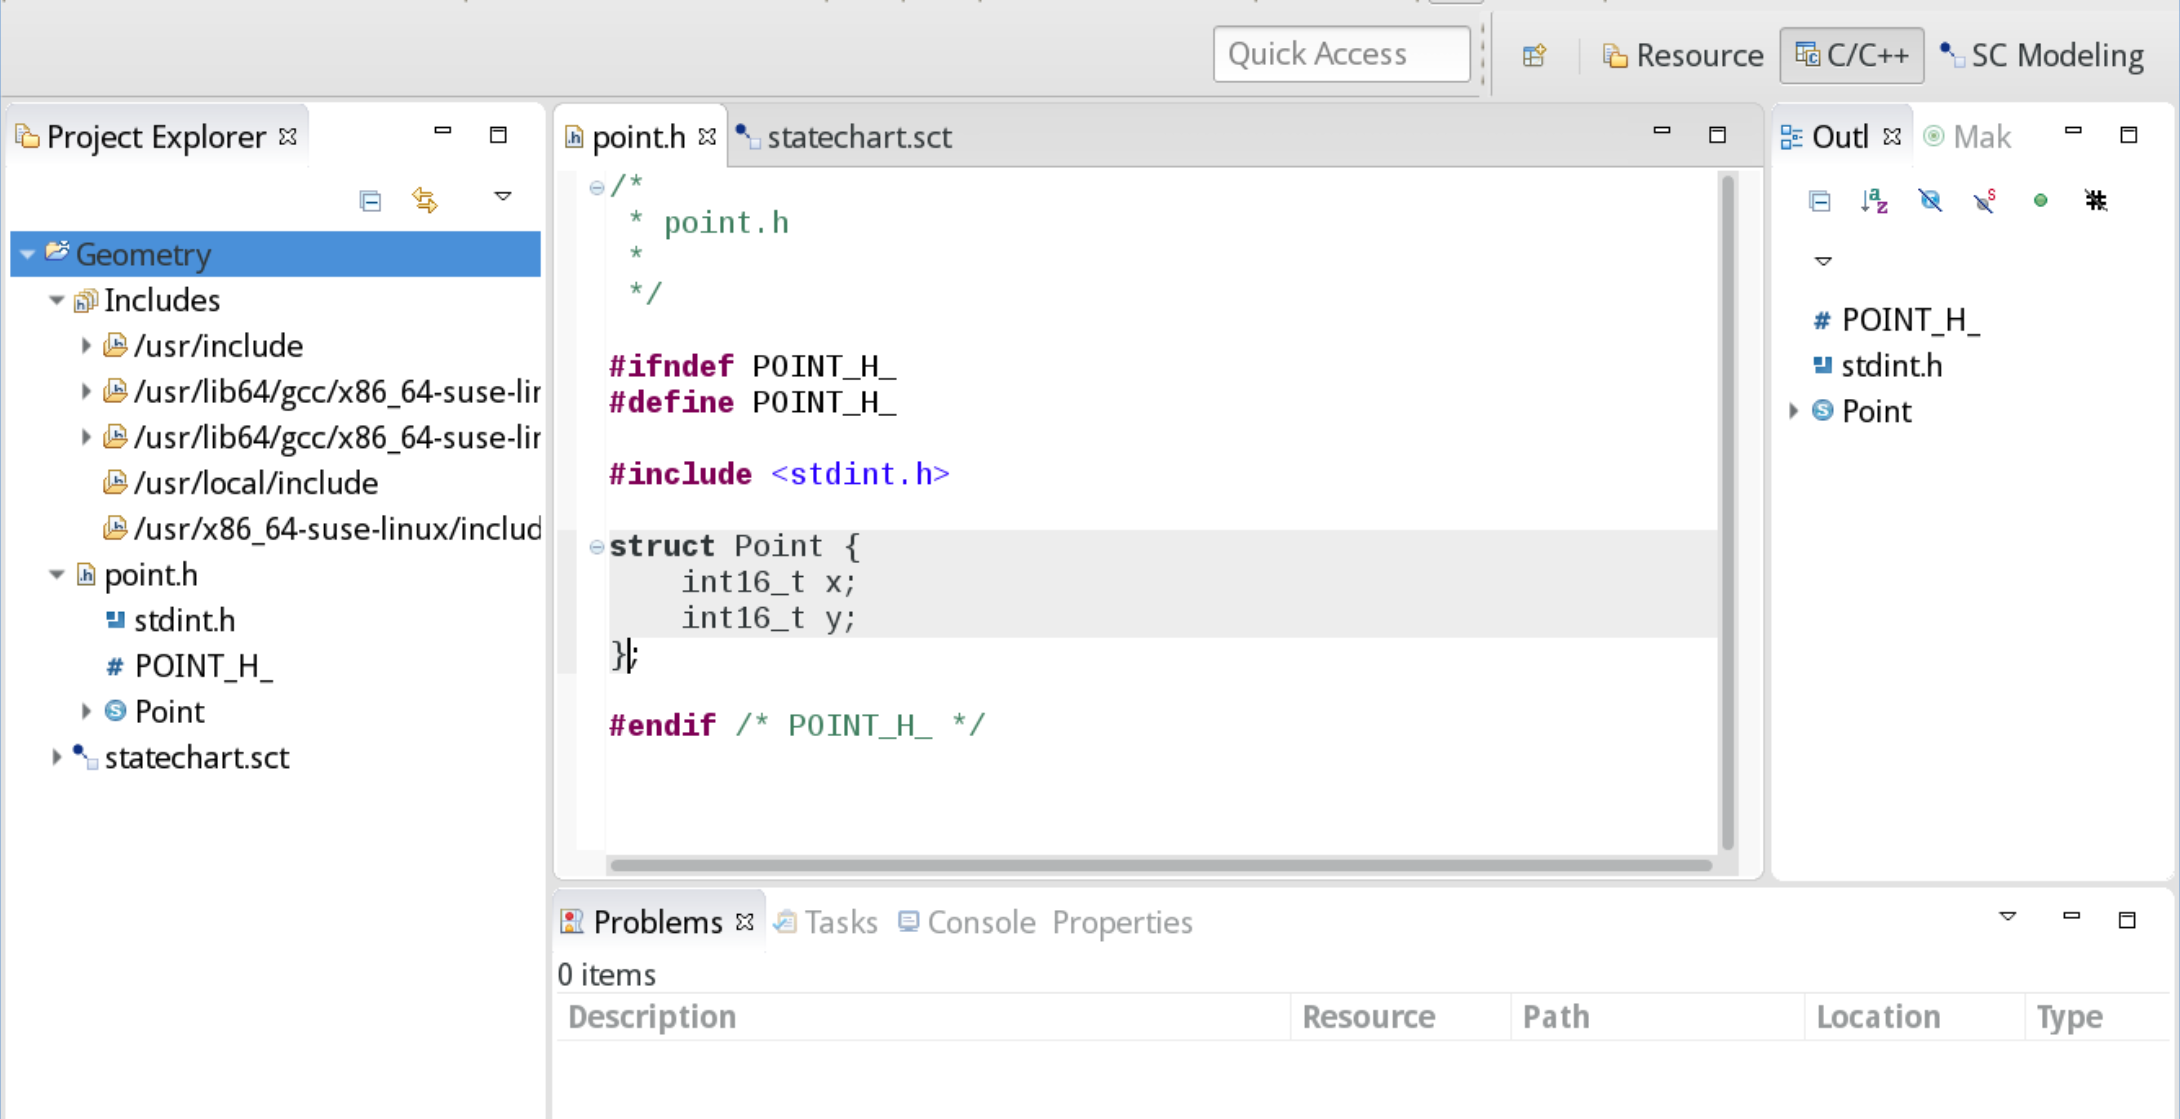
Showing the C type definition
Generating C source code Copy link to clipboard
Code generation, i.e., turning a statechart model into source code of a programming language, is explained in the section Generating state machine code. Therefore we won’t go into the details here, but instead only put some emphasis on code generation specialties of Deep C/C++ Integration.
Creating a generator model Copy link to clipboard
In the statechart model introduced above, do the following:
- In the project view, right-click on the project’s name. The context menu opens.
- In the context menu, select New → Code generator model. The itemis CREATE generator model wizard opens.
- Enter a filename into the File name field, e.g., c.sgen, and click Next >.
- In the Generator drop-down menu, select itemis CREATE Statechart C Code Generator.
- Select the statechart models to generate C source code for. Click Finish.
itemis CREATE creates the following generator model in the file c.sgen:
GeneratorModel for create::c {

    statechart statechart {

        feature Outlet {
            targetProject = "Geometry"
            targetFolder = "src-gen"
            libraryTargetFolder = "src"
        }
    }
}
itemis CREATE creates the target folders src and src-gen and generates the C source representing the statemachine into them.
The generated C code Copy link to clipboard
Particularly interesting are the files Statechart.h and Statechart.c.
Statechart.h first includes the sc_types.h header followed by very same C header files that have been included in the statechart:
#include "sc_types.h"
#include "rectangle.h"
The generated code in Statechart.h then uses the native standard and user-defined C data types. For example, the statechart implementation defines the type StatechartIface as follows:
/*! Type definition of the data structure for the StatechartIface interface scope. */
typedef struct
{
    Rectangle a;
    Rectangle b;
    int32_t area_a;
    int32_t area_b;
    Point p;
} StatechartIface;
By including Statechart.h all definitions are available in Statechart.c, too. For example, a getter and a setter function for the Rectangle variable a are defined as follows:
Rectangle statechartIface_get_a(const Statechart* handle)
{
    return handle->iface.a;
}
void statechartIface_set_a(Statechart* handle, Rectangle value)
{
    handle->iface.a = value;
}
The external area function is called in the entry actions section of state Check:
/* Entry action for state 'Check'. */
static void statechart_enact_main_region_Check(Statechart* handle)
{
    /* Entry action for state 'Check'. */
    handle->iface.area_a = area(handle->iface.a);
    handle->iface.area_b = area(handle->iface.b);
}
The @ShortCIdentifiers annotation Copy link to clipboard
It is possible to add annotations to a statechart’s specification to alter their or the code generator’s behavior, see Statechart Annotations.
The C/C++ domain offers one more annotation: @ShortCIdentifiers helps you to keep the generated code compliant to rules which require C identifiers not to be longer than 31 characters (or rather, to be uniquely identified by the first 31 characters). To achieve this, instead of aggressively shortening names which are part of a statechart’s API, itemis CREATE gives feedback about the names that will be generated and warns if any user input results in C code that is non-compliant with the 31 character rule. This puts the user in charge of the naming scheme and keeps the resulting C identifiers predictable.
This is mainly done by:
- Using only the actual state’s name to identify it and forcing you to use individual names for all states
- Checking all names that will be generated by constructs in the statecharts and providing you with feedback if any of them will be longer than 31 characters
- An intelligent name shortening strategy is applied to the static functions in the statechart’s source file that keeps a good balance between readability and shortness
Please note that the generator model’s option statemachinePrefix is ignored when @ShortCIdentifiers is used.
Keep in mind that all public functions and types of the statechart are prefixed with its name, so keeping that one short helps a lot.
Example Copy link to clipboard
See the following example:
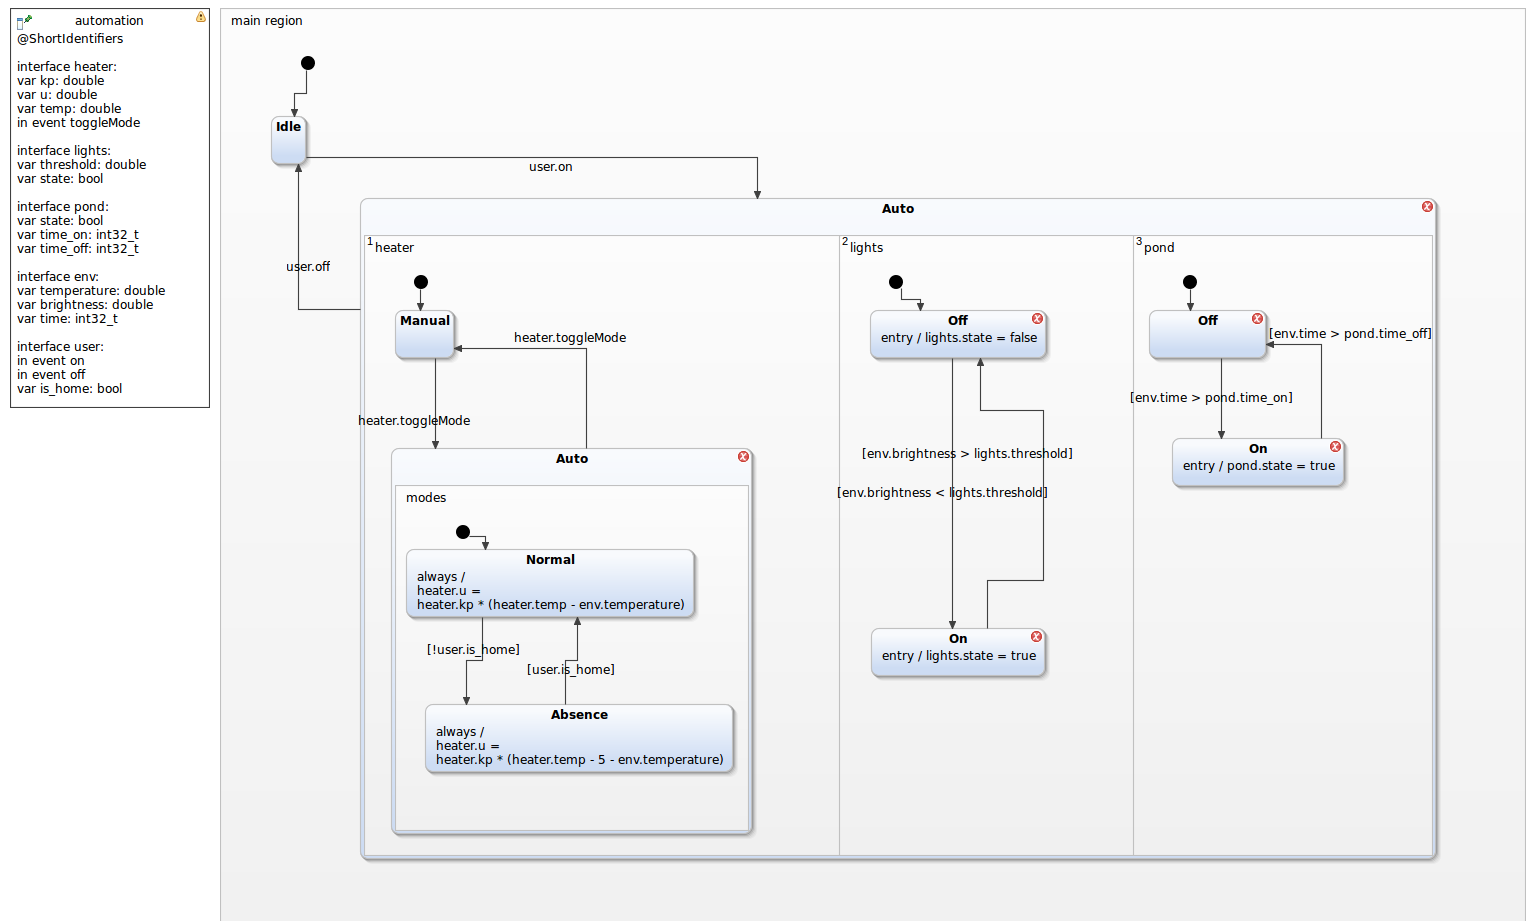
State names that are not globally unique produce errors.
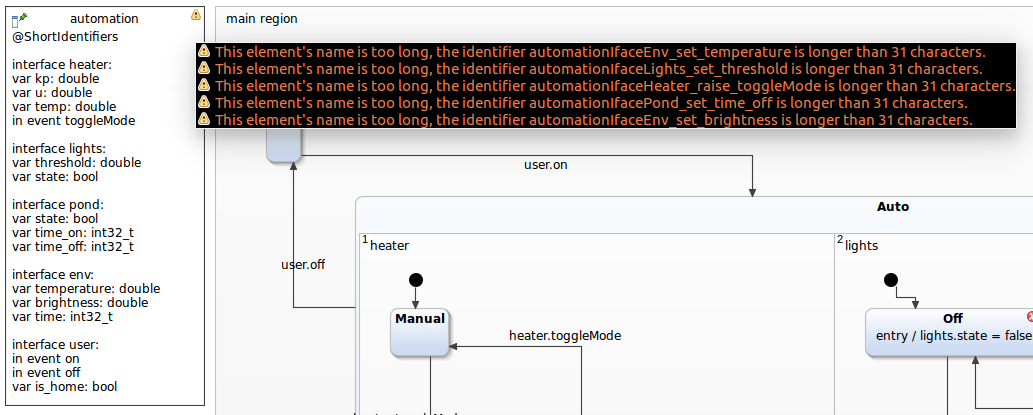
The name of some elements in the definition section produces warnings because resulting identifiers in the source code will be longer than 31 characters.
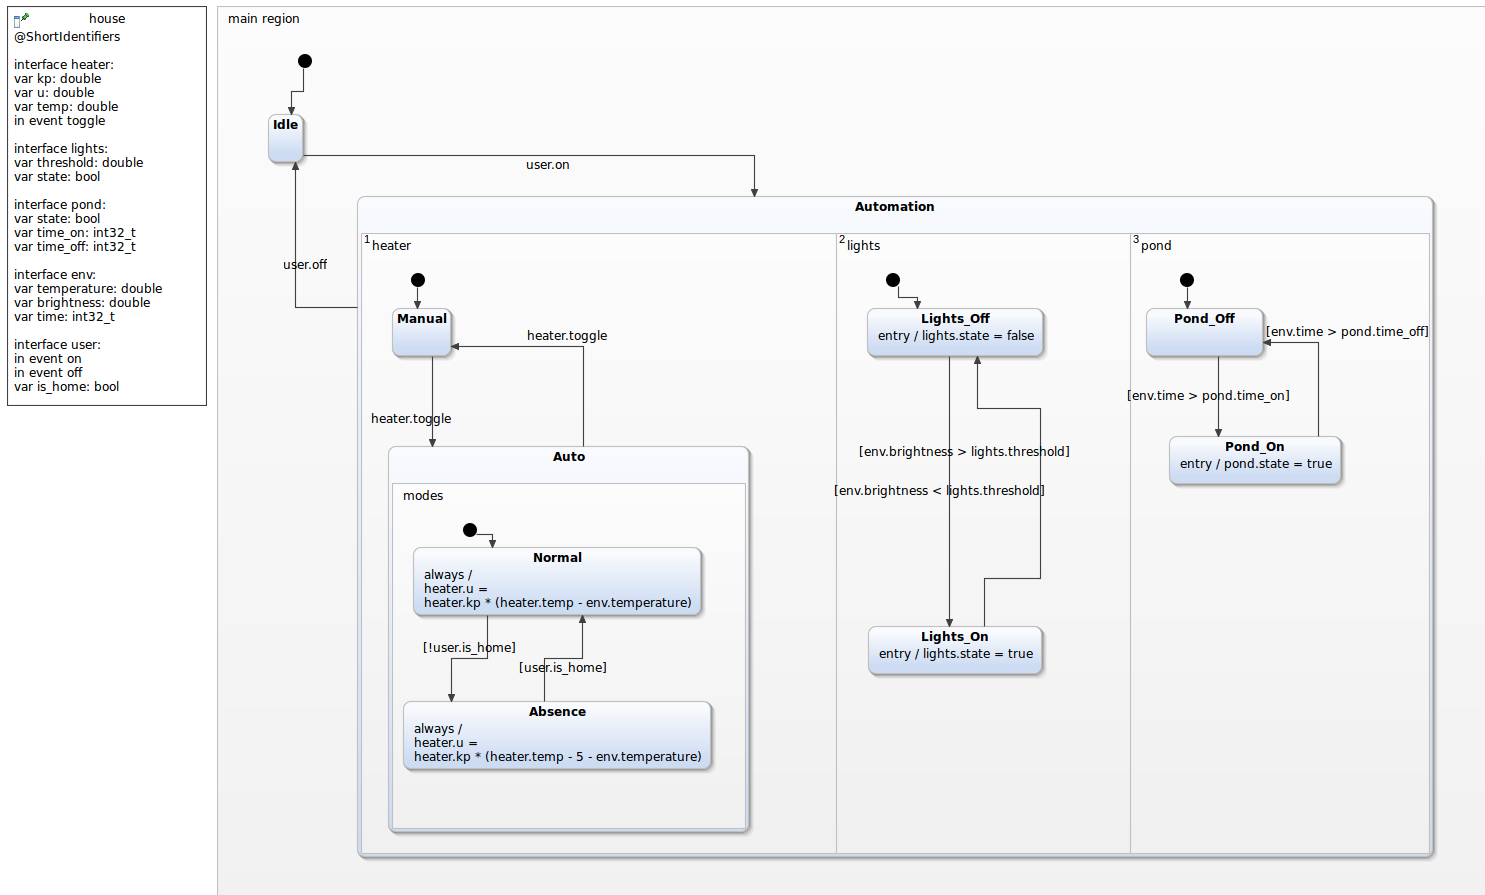
All issues resolved: the states were renamed to be globally unique and some identifiers as well as the statechart’s name were shortened to keep everything short.
The state’s names need to be globally unique because of a change in the naming scheme of the state enum.
Enum without @ShortCIdentifiers:
/*! Enumeration of all states */
typedef enum
{
	House_last_state,
	House_main_region_Idle,
	House_main_region_Automation,
	House_main_region_Automation_heater_Manual,
	House_main_region_Automation_heater_Auto,
	House_main_region_Automation_heater_Auto_modes_Normal,
	House_main_region_Automation_heater_Auto_modes_Absence,
	House_main_region_Automation_lights_Lights_Off,
	House_main_region_Automation_lights_Lights_On,
	House_main_region_Automation_pond_Pond_Off,
	House_main_region_Automation_pond_Pond_On
} HouseStates;
Enum with @ShortCIdentifiers:
/*! Enumeration of all states */
typedef enum
{
	House_last_state,
	House_Idle,
	House_Automation,
	House_Manual,
	House_Auto,
	House_Normal,
	House_Absence,
	House_Lights_Off,
	House_Lights_On,
	House_Pond_Off,
	House_Pond_On
} HouseStates;
Notice how the state’s names are not prefixed with their containing regions anymore to save characters.
The name shortening algorithm for the static functions works like this, again without @ShortCIdentifiers:
/* prototypes of all internal functions */
static sc_boolean check_main_region_Idle_tr0_tr0(const House* handle);
static sc_boolean check_main_region_Automation_tr0_tr0(const House* handle);
static sc_boolean check_main_region_Automation_heater_Manual_tr0_tr0(const House* handle);
static sc_boolean check_main_region_Automation_heater_Auto_tr0_tr0(const House* handle);
static sc_boolean check_main_region_Automation_heater_Auto_modes_Normal_lr0_lr0(const House* handle);
static sc_boolean check_main_region_Automation_heater_Auto_modes_Normal_tr0_tr0(const House* handle);
static sc_boolean check_main_region_Automation_heater_Auto_modes_Absence_lr0_lr0(const House* handle);
static sc_boolean check_main_region_Automation_heater_Auto_modes_Absence_tr0_tr0(const House* handle);
static sc_boolean check_main_region_Automation_lights_Lights_Off_tr0_tr0(const House* handle);
static sc_boolean check_main_region_Automation_lights_Lights_On_tr0_tr0(const House* handle);
static sc_boolean check_main_region_Automation_pond_Pond_Off_tr0_tr0(const House* handle);
static sc_boolean check_main_region_Automation_pond_Pond_On_tr0_tr0(const House* handle);
With @ShortCIdentifiers annotation:
/* prototypes of all internal functions */
static sc_boolean Idle_tr0_check(const House* handle);
static sc_boolean Automation_tr0_check(const House* handle);
static sc_boolean Manual_tr0_check(const House* handle);
static sc_boolean Auto_tr0_check(const House* handle);
static sc_boolean Normal_lr0_check(const House* handle);
static sc_boolean Normal_tr0_check(const House* handle);
static sc_boolean Absence_lr0_check(const House* handle);
static sc_boolean Absence_tr0_check(const House* handle);
static sc_boolean Lights_Off_tr0_check(const House* handle);
static sc_boolean Lights_On_tr0_check(const House* handle);
static sc_boolean Pond_Off_tr0_check(const House* handle);
static sc_boolean Pond_On_tr0_check(const House* handle);
Currently supported primitive types Copy link to clipboard
Deep C/C++ Integration natively supports the following primitive C types. That is, in a statechart without any additional data type definitions, the following types are readily available:
- bool
- double
- float
- int16_t
- int32_t
- int64_t
- int8_t
- string
- uint16_t
- uint32_t
- uint64_t
- uint8_t
- void
Current restrictions Copy link to clipboard
The current release candidate of itemis CREATE PRO is still missing some C functionalities that will be approached as soon as possible by subsequent releases. Among others, the following issues are known to be not available yet:
Syntax issue when declaring nested pointers. Copy link to clipboard
There is a known syntax issue when declaring nested pointers in the statechart’s definition section. It is required to put a space
between every closing character (>) after declaring the type for the pointer.
Type range checks Copy link to clipboard
Type range validations are currently not implemented. As a consequence, it is possible to e.g., assign an int32_t value to an int8_t variable one without any warning.
Plain struct, union, and enum types Copy link to clipboard
In C it is possible to define structs, unions and enums without a typedef. They can be referenced by using the corresponding qualifying keyword ( struct, union, or enum, respectively). As the statechart language does not support these qualifiers, the usage of struct, union and enumeration types is currently restricted to those defined by a typedef.
Evaluation of functions in the simulation Copy link to clipboard
Using the C/C++ domain, it is possible to call functions that are declared in header files. The generated code will do this correctly, but the simulation will not actually evaluate the functions, for multiple reasons:
- Parsing and interpreting C-Code completely and correctly with all possible side effects is very hard and we could never guarantee that itemis CREATE does the right thing in the simulation.
- Even if we could do that, the Compiler can link against one of many possible implementations of the same declaration, and choosing the correct one would be pretty hard, too.
Due to this, we decided not to implement this feature, and doing so is currently not on our roadmap.
However, when using our testing framework SCTUnit, you have the option to mock these functions, and these mocks are then called during testing.
Constructors Copy link to clipboard
Using the C/C++ domain allows you to import classes defined in a C++ header file, and use them as types. This means that you can instantiate objects of these types just like in regular C++ code. However, itemis CREATE currently does not support constructors, so there are certain limitations:
- If the class has a default constructor with no arguments, you can just declare the variable as usual in the statechart:
var o: MyClass. The constructor of the generated statechart class will then automatically call the default constructor ofMyClassto instantiate the object. - If the class does not have a default constructor, this will fail. In this case, you should declare a pointer instead:
var o: pointer<MyClass>- this way, the constructor of the statechart does nothing at all. Instead, you can then assign a proper value to it, ideally after you call the statechart’sinit-function, and before you call theenter-function. This ensures correct initialization before the statechart is running.
Please get in touch with us Copy link to clipboard
Please note that the preceding list of restrictions might not be complete. If you discover any further problems, please do not hesitate to contact us! Your feedback is highly appreciated!
p.